Abstract
The distribution of macrohardness of the material of a welded joint made of high-strength steel in the vicinity of a weld with an austenitic structure has been studied. The characteristics of the material's homogeneity, technological damageability, and the intensity of its growth have been determined using the LM-hardness method. The obtained characteristics of the material are considered according to the distance from the axis of the weld. It is shown that using the dispersion of important physical and mechanical characteristics to analyze the material homogeneity makes it possible to consider the differences in relation to the base material, structure, and properties of the weld. The method used in the work to assess the material damageability can be used for a welded joint that is heterogeneous in material. The obtained results are applicable in developing the technique of heterogeneous weld joints made of high-strength steels, as well as in the study of existing welded critical structures of long-term operation, in particular, main pipelines.
1. Introduction
Modern trends in industry in the development of new structures and the reconstruction of existing ones are aimed at the use of high-strength steels. This is due to a number of economic and technological factors. In particular, such new materials make it possible to obtain less metal-intensive products while maintaining performance [1]. As a result, the requirements for resource and energy improvement of production are achieved when solving such technological problems. In particular, using high-strength steels in pipeline transport increases operational loads and transportation volumes [2, 3]. At the same time, welding processes are mostly an integral part of production and are widely used. However, the difficulties accompanying the manufacture of a welded structure often require a more detailed study of the problem [4, 5].
Applicable modern high-strength steels are characterized by a complex alloying system combined with multi-stage thermo mechanical treatment. As a result, the finely dispersed structure of the material is obtained with a complex structural-phase composition. Despite its transience and locality, the thermal deformation welding cycle has a wide range of heating temperatures, particularly before the material melts. Therefore, the processes of recrystallization and the formation of intermediate and quenching structures are observed in the vicinity of the welded joint [6]. As a result, the initiation and occurrence of brittle cracks in the near-seam areas under the influence of welding and residual stresses is possible. The use of high-alloy welding consumables with an austenitic structure partially reduces these effects due to the higher deformation capacity of the weld material [4, 7].
The difference between the temperature deformations of dissimilar materials of the weld and the base metal, low-temperature transformations in the austenitic structure, and partially the base metal lead to the emergence of a complex stress-strain state of the welded joint. A zone of thermal deformation influence is formed, which covers not only the weld and adjacent areas with structural changes but also partially the base metal [8, 9]. Noticeable structural changes do not occur in the base material, but the material undergoes additional deformation effects. These factors affect the durability of the welded joint of the structure, which is made of high-strength steel [10, 11].
A scientific and methodological approach based on assessing the scattering characteristics of the measured hardness values is proposed to change the parameters of the surface layers of metal workpieces at their machining [12, 13]. The dynamics of changes in material parameters are carried out not by absolute or average values of physical quantities but by their scattering, which is obtained based on processing an array of measured data. The obtained characteristics allow for assessing the degree of material degradation of blanks and workpieces. Therefore, this technique is important for researching the effect of the welding cycle on the formation of a heterogeneous welded joint.
2. Literature review
The problem of ensuring the quality of structural elements particularly welded joints of high-strength steels, is considered comprehensively, considering technical and economic tasks [6, 14]. Therefore, traditional approaches to ensure technological strength through additional partial or complete heat treatment of welded structures cannot consistently be implemented. Plastic welds, preferably with an austenitic structure, are more applicable. This provides partial relaxation of welding stresses, increased crack resistance of the weld root, and the lower melting point of austenite contributes to partial “healing” of tears in grain boundaries in the fusion zone [4, 6]. However, the difference in the physical and chemical parameters of the base and welding materials leads to structural heterogeneity in the fusion zone [6, 7] and the formation of intermediate and final brittle structures [6]. The formation of a complex stress-strain state of a welded joint should be singled out separately [15], which is due to low-temperature transformations in a high-alloyed material.
Therefore, several factors must be considered for connections made of high-strength steels, especially critical structures, such as main pipelines [16, 17]. In particular, the features of the product's design, the requirements for the technique of implementation of the welding method used, the properties of the base and welding materials, and the characteristics of the heating source are among the following factors [18, 19]. However, if the design is produced in the field and is in long-term operation, this approach does not always guarantee an adequate result. Therefore, modeling methods do not always make it possible to perform an adequate assessment and obtain high-quality results. Complex approaches that combine experimental methods, such as macro hardness values and appropriate mathematical models, are more applicable in mechanical engineering practice.
In particular, the use of data on the macro hardness of the material to assess the technological damageability of the material after its machining, the use of complex operational loads, and long-term technological processes are disclosed in the works [12, 13]. A methodology for assessing the properties of the structural material, establishing the degree of its degradation due to operational and technological factors, and the presence of technological defects is offered [12]. The Weibull homogeneity coefficient and the associated integral characteristics of the material are suggested to be used as indicators of the criterion of the material homogeneity according to the existing damages [12, 13].
An assessment of the qualitative characteristics of the material of a welded joint with an austenitic seam is carried out in the article, taking into account the influence of the technological process of fusion welding on the material of a welded joint with an austenitic seam.
3. Research methods
Welded joints of sheet elements with a thickness of 10.0 mm made of high-strength alloy steel type 34KhN2MA (mass %: 0.27 C; 0.259 Si; 0.941 Mn; 0.757 Cr; 0.208 Mo; 1.16 Ni; 0.142 Cu; 0.057 V; 0.059 W) were used for experimental studies. The strength characteristics of the material are commensurate with the currently used steels X100 – X120 for critical structures such as main pipelines [2, 20]. Electrode wires of the SV-08Х20Н9Г7Т (ER 307) type were used for welding, which provided an austenitic structure of the deposited metal (mass %: 0.08 C; 0.90 Si; 7.00 Mn; 18.00 Cr; 8.00 Ni). The process was carried out semi-automatic with an electrode wire with a diameter of 1.2 mm in a media of an inert gas, argon, with a slight addition of oxygen (98% Ar + 2 % O2). The welded joint was filled in two passes.
The microstructure of the welded joint material and its characteristic areas (weld, heat-affected zone, base metal) was studied using an optical microscope (NEOFOT 21) by metallographic method. Chemical etching of the surface was carried out in a 4 % solution of HNO3 in ethyl alcohol. The EVO-40XVP electron (scan) microscope with the INCA Energy 350 spectral microanalysis system was also used in the research.
Macrohardness measurements were carried out according to the standard method. The studied area of the welded joint was divided into separate linear sections parallel to the axis of the weld, with a pitch of 5 mm. This made it possible to perform a significant number of measurements in a single section along a defined line. The hypothesis is accepted that the movement of the welding torch was uniform, as close as possible to a straight motion.
Weibull's physical law of the distribution of physical quantities was chosen to analyze physical processes closely related to applied materials science and mechanical engineering, for example, in developing statistical theories of strength [13]. The evaluation criterion is the homogeneity of the surface layer of the product as an indicator for characterizing the degree of degradation of its material based on statistical processing of hardness control values. Homogeneity in the Weibull distribution [21]:
where is a tension; is a certain parameter of the Weibull distribution. Indicator () is a structurally sensitive parameter – the Weibull homogeneity coefficient (WHC) – characterizes the degree of degradation of the materials structure of machine parts [12, 13]:
where is the average value of macrohardness; is the current value of macrohardness.
An important condition for implementing the LM-hardness method is to control and analyze not the absolute (average) values of macrohardness parameters but its dispersion in a specific section of product material. The rate of WHC () changes is described by the technological damageability for specific conditions [12, 13]:
where , are the WHC () of the base material and the -th section, respectively.
The numerical value of the WHC () reflects the degree of homogeneity of the material and the degree of its degradation: a decrease in the coefficient indicates the accumulation of internal damage due to technological influences, and an increase – on the contrary, indicates a decrease in probable defects. In addition, the numerical value of m characterizes the state of structural homogeneity of the material: 10 corresponds to the state of the structurally inhomogeneous material [12, 13].
This approach makes it possible to quantify the impact of the thermal welding cycle on the damage characteristics of the material in a particular section. The dependence of the increase in the damage parameter with distance from the axis of the weld can also be studied for specific production conditions.
4. Research results
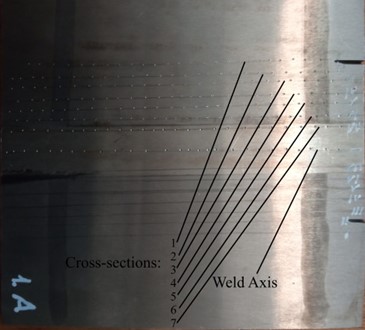
The experimental sample with a set of measurements is presented in Fig. 1.
Fig. 1The experimental sample with designated cross-sections of measurements

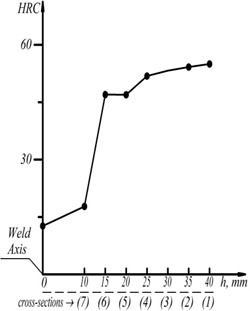
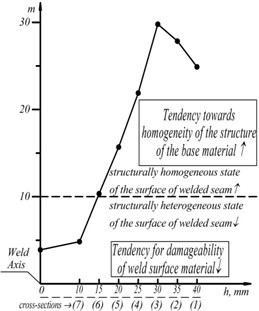
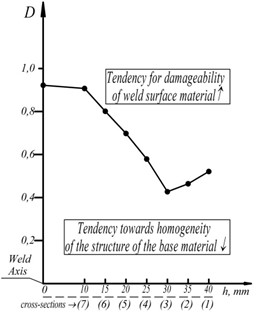
The results of measuring of the average macrohardness HRC and the indicators of the material homogeneity criterion in the cross-sections of the welded joint of high-strength steels with an austenitic weld, in particular the WHC () and technological damageability , are shown in Fig. 2.
Analysis of the dynamics of changes in the surface hardness of the weld material and the indicators of the material homogeneity criterion (MHC) allows us to draw the following conclusions. The average surface macrohardness in the weld zone varies within HRC [12.6; 55], but the nature of its change varies in different ranges (see Fig. 2(a)). In particular, this change occurs rapidly at HRC [12.6; 47] at a distance of up to 15 mm from the axis of the weld. This is due to the significant heterogeneity of the surface layer in the sections locatenearto the axis of the wed, and the susceptibility to its technological damageability in the sections under consideration. On the other hand, the surface macrohardness varies more evenly: HRC [47; 55] in cross-sections located at distances from 15 to 40 mm from the axis of the weld. The surface macrohardness corresponds to the average macrohardness of the base material at a distance of 40 mm from the axis of the weld (see Fig. 2(a)).
The surface layer of the material in the cross-section along the axis of the welded austenitic seam is characterized by unsatisfactory parameters of homogeneity, which correspond to the state of a structurally heterogeneous material. This is confirmed by the numerical values of MHC, in particular, the values of the WHC () 4.04 (→ 0) < 10 (see Fig. 2(b); and technological damageability 0.92 (92 %) → 1 (see Fig. 2(c)).
The surface layer of the material, located at a distance of up to 15 mm from the axis of the weld (cross-sections 7, 6), corresponds to the state of a structurally heterogeneous material and is determined by the low homogeneity of the surface and its high susceptibility to technological damageability. Cross-section 7 is characterized by a change in the indicators of the surface homogeneity criterion compared to the corresponding values along the axis of the weld; in particular, the WHC () increases from 4.04 to 4.84 < 10 (see Fig. 2(b)). At the same time, the value of technological damageability (D) decreases from 0.92 (92 %) to 0.91 (91 %) (see Fig. 2(с)).
Fig. 2Dynamics of changes in the average macrohardness HRC a), WHC (m) b) and technological damageability D b) in the cross-sections of the zone of the welded austenitic seam

a)

b)

c)
On the other hand, the surface layer of the welded austenitic seam in cross-section 6 is characterized by the state of structurally homogeneous material, which is described by the following parameters of MHC: values of the WHC () 10.34 > 10 (see Fig. 2(b)) and technological damageability () 0.80 (80 %) (see Fig. 2(с)).
Further improvement of the homogeneity of the surface layer of the material occurs in sections 5-3, located respectively at a distance of 20, 25, and 30 mm from the axis of the austenitic weld. This can be observed by a corresponding change in the numerical values (cross-sections 5-3) of the MHC indicators: WHC () [15.68; 29.79] > 10 (see Fig. 2(b)) and the value of technological damageability () [0.70; 0.43] or [70 %; 43%] (see Fig. 2(c)).
A slight change in the homogeneity of the surface layer of the material (in the direction of deterioration) takes place in cross-sections 2; 1, located at a distance of 35 and 40 mm respectively from the axis of the austenitic weld, which is determined by a decrease in the WHC () from 29.79 to 24.89 (see Fig. 2(b)) and an increase in the value of technological damageability () from 0.43 (43 %) to 0.52 (52 %) (see Fig. 2(c)).
5. Conclusions
The main conclusions have been made based on the results of our research.
1) The LM-hardness method and the technique for determining the main indicators of the material homogeneity criterion are used for the first time to analyze the condition of the high-strength steel connection with an austenitic seam. Using the LM-hardness method allows for assessing the degree of damageability to the weld. Still, the significant heterogeneity of the base metal and the weld, in this case, does not affect the results of the obtained parameters.
2) The technological inheritability of the characteristics of the connection of high-strength steel with an austenitic seam assurances the evolution of a structurally heterogeneous material in the vicinity of the weld axis into a structurally homogeneous material at a distance of 15 and more mm from the weld axis. This is ensured by an increase in WHC () from 4.04 (cross-section related to the axis of the welded austenitic seam) to 24.89-29.79 (for cross-sections at a distance of 30-40 mm from the axis of the weld seam).
3) On the other hand, the technological damageability decreases from 0.92 (cross-section related to the axis of the welded austenitic seam) to ( 0.43-0.52) (for cross-sections at a distance of 30-40 mm from the axis of the weld seam), which provides a structurally heterogeneous material in the vicinity of the weld axis into a structurally homogeneous material at a distance of 15 and more mm from the weld axis.
4) The developed technique can be applied to analyze the dynamics of changes in material homogeneity of different types of welded seams in different cross-sections.
References
-
A. La Monaca et al., “Surface integrity in metal machining – Part II: Functional performance,” International Journal of Machine Tools and Manufacture, Vol. 164, p. 103718, May 2021, https://doi.org/10.1016/j.ijmachtools.2021.103718
-
D. A. Ringinen, A. V. Chastukhin, G. E. Khadeev, L. I. Efron, and P. P. Stepanov, “A weldability study of steel of strength class X100,” Metallurgist, Vol. 57, No. 11-12, pp. 1112–1119, Apr. 2014, https://doi.org/10.1007/s11015-014-9854-x
-
E. Hoyos, M. C. Serna, J. de Backer, and J. Martin, “Sustainability score comparison of welding strategies for the manufacturing of electric transportation components,” Sustainability, Vol. 15, No. 11, p. 8650, May 2023, https://doi.org/10.3390/su15118650
-
A. R. Dzyubyk, A. A. Voitovych, L. V. Dzyubyk, and L. O. Babii, “Specific features of the fatigue fracture of welded joints of 34KhN2MA steel formed by electrodes with different phase compositions,” Materials Science, Vol. 54, No. 2, pp. 215–222, Nov. 2018, https://doi.org/10.1007/s11003-018-0176-1
-
V. A. Osadchuk, L. I. Tsymbalyuk, and A. R. Dzyubyk, “Determination of the triaxial distribution of residual stresses in welded joints of structural elements with rectilinear seams and estimation of their influence on joint strength in the presence of crack-type defects,” Journal of Mathematical Sciences, Vol. 183, No. 2, pp. 150–161, Apr. 2012, https://doi.org/10.1007/s10958-012-0803-6
-
A. Dzyubyk, L. Lisovska, A. Voitovich, I. Khomych, O. Soloviov, and L. Dzyubyk, “Investigation in structure of fusion zone of welded joint of high-strength steel with austenite weld,” Lecture Notes in Networks and Systems, Vol. 1069, pp. 346–355, Jul. 2024, https://doi.org/10.1007/978-3-031-66268-3_34
-
A. R. Dzyubyk, “Impact toughness of welded joints on 34KhN2MA steel produced from electrodes with various phase compositions,” Materials Science, Vol. 56, No. 2, pp. 203–209, Nov. 2020, https://doi.org/10.1007/s11003-020-00416-y
-
Y.-J. Chang et al., “Environmental and social life cycle assessment of welding technologies,” Procedia CIRP, Vol. 26, No. 26, pp. 293–298, Jan. 2015, https://doi.org/10.1016/j.procir.2014.07.084
-
N. Mendes, P. Neto, A. Loureiro, and A. P. Moreira, “Machines and control systems for friction stir welding: A review,” Materials and Design, Vol. 90, No. 90, pp. 256–265, Jan. 2016, https://doi.org/10.1016/j.matdes.2015.10.124
-
V. Patel et al., “High speed friction stir welding of AA6063-T6 alloy in lightweight battery trays for EV industry: Influence of tool rotation speeds,” Materials Letters, Vol. 318, p. 132135, Jul. 2022, https://doi.org/10.1016/j.matlet.2022.132135
-
A. Gunasekaran and A. Spalanzani, “Sustainability of manufacturing and services: Investigations for research and applications,” International Journal of Production Economics, Vol. 140, No. 1, pp. 35–47, Nov. 2012, https://doi.org/10.1016/j.ijpe.2011.05.011
-
Y. Kusyi et al., “Control of the parameters of the surface layer of steel parts during their processing applying the material homogeneity criterion,” Eksploatacja i Niezawodność – Maintenance and Reliability, Vol. 26, No. 3, p. 18779, Apr. 2024, https://doi.org/10.17531/ein/187794
-
Y. Kusyi, O. Onysko, A. Kuk, O. Kostiuk, and B. Solohub, “Improvement of the technique of optimal technological routes planning for machining of the machine parts surfaces,” in Lecture Notes in Networks and Systems, Cham: Springer Nature Switzerland, 2023, pp. 221–232, https://doi.org/10.1007/978-3-031-31066-9_23
-
Z. Liao et al., “Surface integrity in metal machining – Part I: Fundamentals of surface characteristics and formation mechanisms,” International Journal of Machine Tools and Manufacture, Vol. 162, p. 103687, Mar. 2021, https://doi.org/10.1016/j.ijmachtools.2020.103687
-
E. Andreikiv, V. R. Skal’S. ’Kyi, Y. Dolins’Ka, and A. Dzyubyk, “Influence of corrosive hydrogenating media on the residual service life of structural elements in the maneuvering mode of operation,” Materials Science, Vol. 54, No. 1, pp. 61–68, Nov. 2018, https://doi.org/10.1007/s11003-018-0158-3
-
J. Jamal, “Sustainability assessment of welding processes,” Master’s Thesis, American University of Sharjah, Sharjah, United Arab Emirates, 2017.
-
T. Majeed, M. A. Wahid, M. N. Alam, Y. Mehta, and A. N. Siddiquee, “Friction stir welding: A sustainable manufacturing process,” Materials Today: Proceedings, Vol. 46, pp. 6558–6563, Jan. 2021, https://doi.org/10.1016/j.matpr.2021.04.025
-
A. Służalec, Theory of Thermomechanical Processes in Welding. Dordrecht: Springer Netherlands, 2005, https://doi.org/10.1007/1-4020-2991-8
-
H. Li et al., “A cross-sectional study of the cardiovascular effects of welding fumes,” PLOS ONE, Vol. 10, No. 7, p. e0131648, Jul. 2015, https://doi.org/10.1371/journal.pone.0131648
-
O. M. Berdnikova, “Physico-mechanical properties of welded joints of high-strength steel with the yield strength of 690-1300 MPa,” The Paton Welding Journal, Vol. 2021, No. 4, pp. 2–8, Apr. 2021, https://doi.org/10.37434/tpwj2021.04.01
-
N. R. Muzyka, V. P. Shvets, and A. V. Boiko, “Procedure and Instruments for the material damage assessment by the lm-hardness method on the in-service scratching of structure element surfaces,” Strength of Materials, Vol. 52, No. 3, pp. 432–439, Aug. 2020, https://doi.org/10.1007/s11223-020-00195-6
About this article
The research was partially supported by the EU NextGenerationEU through the Recovery and Resilience Plan for Slovakia under project no. 09I03-03-V01-00094 and International Association for Technological Development and Innovations.
The datasets generated during and/or analyzed during the current study are available from the corresponding author on reasonable request.
The authors declare that they have no conflict of interest.
