Abstract
This paper develops a new technology for the quality inspection of the transmission line that is important across the tensile clamp. The new technology mainly based on the ultrasonic pulse echo thickness measurement mechanism tests the thickness of the aluminum sleeve after crimping the tensile clamp to reflect the relative position of the aluminum sleeve and the steel anchor after the crimping, thereby judging whether there is a crimping positioning defect. At the same time, it is supplemented by steel anchor model comparison, crimping position length comparison, and crimping to margin detection to determine whether the transmission line crimping quality is qualified.
1. Introduction
With the continuous improvement of infrastructure around the world, overhead transmission lines and high-speed railways, highways, important transmission channel sections (referred to as “three-span”) and electrified railways inevitably cross over, and the wire breakage failure will cause immeasurable loss. The tension clamp is the most important diversion and force transmission component, and the quality of the crimp installation directly determines the safe operation of the transmission line. However, the overhead transmission line conductors in China are all hydraulically connected. The on-site construction process and the quality of the crimping connection cannot be monitored. The single-person high-altitude crimping operation is difficult and unsupervised. When the line is completed and accepted, it cannot be inspected on site, so the crimping has serious quality hazards. The faults causing the tension of the tension-resistant connecting pipe steel core of the transmission line occur frequently, which seriously affects the safe and stable operation of the power grid. Therefore, it is urgent to carry out research on the quality inspection of tension-clamping crimping of transmission lines, study the key technical methods of crimping quality inspection, and provide reliable technical support for safe and stable operation of power grids.
2. Test detection
In order to compare the non-destructive testing effect of the “three-span” tensile clamp crimping quality of the transmission line and the influence of the crimping defects on the mechanical properties, two typical conductors LGJ400/50 and LGJ300/40 in 500 kV and 220 kV transmission lines were selected for the simulated crimping defect test. The corresponding tensile clamp models were NY400/50 and NY300/40. One end of the two kinds of wires is normally crimped according to the requirements of the DL/T5285-2013 “Technical Regulations for Overhead Conductors and Ground Wire Hydraulic Crimps for Transmission and Distribution Engineering”. The other end of the wire LGJ300/40 simulates a groove not crimped, and the other end of the wire LGJ400/50 simulates two grooves not crimped.
2.1. X-ray inspection
The portable X-ray inspection device has a total weight of 3 kg, an axial maximum imaging length of 480 mm, a voltage of 75 kV, and a current of 0.35 mA. The ray machine uses a rechargeable battery, and the imaging data is transmitted wirelessly in real time. Non-destructive testing of radiation is performed after the sample is crimped. The radiographic imaging can clearly show the internal defects of the crimping.
2.2. Ultrasonic detection
One end of the tensile clamp steel anchor is generally designed with 2 to 3 grooves having a depth of about 2 mm and a width of 7-10 mm. After the aluminum sleeve is crimped, plastic deformation occurs, and the aluminum sleeve portion corresponding to the groove is squeezed into the groove, so that the thickness of the aluminum sleeve corresponding to the non-groove is about 2 mm thinner than it. Therefore, as long as the thickness of the aluminum sleeve corresponding to the groove can be detected, it can be determined whether the positioning of the steel anchor and the aluminum sleeve is accurate when the clamp is crimped. The ultrasonic thickness measurement was performed on the crimping test, and the method can quickly distinguish the defects. The test results are shown in Table 1.
Table 1Ultrasonic thickness measurement
Tension clamp | Thickness measurement at the groove of the normal crimping end | Analog defect |
NY400/50 | The two maximum values are 7.49 mm and 7.50 mm, respectively, and the minimum average is 5.33 mm | The average thickness measurement is 5.34 mm |
NY300/40 | The two maximum values are 6.90 mm and 6.88 mm, respectively, and the minimum average is 5.09 mm | One maximum is 6.89 mm and the minimum average is 5.10 mm |
Fig. 1Determination of aluminum layer thickness in anchor grooves of steel with tension line
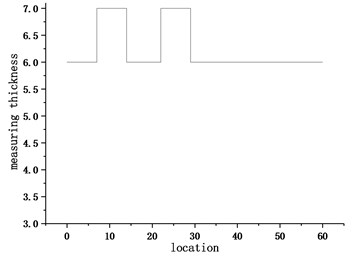
Principle interpretation is as follows. Ultrasound is an elastic wave that can spread in solid, liquid, and gas. Ultrasonic waves travel at the same speed in the same medium, but the reflection and refraction of waves occur when they encounter a fixed gas interface. Due to the presence of gas at the interface between the steel anchor and the aluminum sleeve in the tension clamp, the contact between the aluminum sleeve and the steel anchor in the wire clamp will cause the emission of the ultrasonic inspection. Therefore, by measuring the time difference between the incident and the reflection of the ultrasonic wave and querying the propagation speed of the ultrasonic wave in the aluminum sleeve, the thickness of the aluminum sleeve can be measured.
2.3. Mechanical properties test
Mechanical test of two wires. During the tensile test, the two tensile clamp aluminum sleeves simulating the crimping defects have a certain amount of slip on the steel anchor, while the other normal crimping end has no slip. The test found that the NY400/50 tensile clamps with two grooves not pressed are more slippery, indicating that the holding force between the aluminum sleeve and the steel anchor is insufficient due to the defect. The load is mainly carried by the steel core. After the steel anchor is broken, the two tensile clamps are all slipped off the steel anchor. The tensile strength of the tensile clamp of the two grooves not crimped is 79.7 % of the value of the tensile force of the wire, and the tensile strength of the tensile clamp of a groove not crimped is 104 % of the value of the tensile force of the wire. The test shows that the aluminum wire part of the wire bears part of the load on the wire, which varies according to the wire type. The test results are shown in Table 2.
Table 2Mechanical properties test
Working condition | Wire breaking force (kN) | Test value |
Two grooves are not crimped (LGJ400/50) | 123.4 | 98.4 |
One groove is not crimped (LGJ300/40) | 92.22 | 96.1 |
3. On-site inspection
In the ultrasonic testing, firstly, the ultrasonic thickness measuring device is calibrated, and one of the six crimping planes of the steel anchor aluminum sleeve is selected, and the paste coupling agent is evenly applied on the pressure bonding surface. On the basis of the above preparatory work, the probe of the ultrasonic thickness measuring device is lightly pressed on the center line of the crimping plane of the aluminum sleeve, and the thickness of the detecting crimping surface is slowly moved from the head to the tail along the longitudinal axis direction, and recording is performed. After replacing the other crimping surface of the clamp, measure the thickness of the crimped portion of the aluminum sleeve and record it in the same way. Finally, the thickness data is analyzed. If the thickness of the crimping surface is changed from 2 to 3 times greater than 1 mm in the longitudinal direction, it can be judged that the crimping position is accurate. The thickness of the two grooves is dissected as shown in Fig. 2. If the thickness in the longitudinal direction does not correspond to the change in the number of grooves, it can be judged that the crimping process is poor, and there is a crimping positioning defect. Ultrasonic field detection is shown in Fig. 3.
Fig. 2Anatomy of the aluminum casing corresponding to the groove

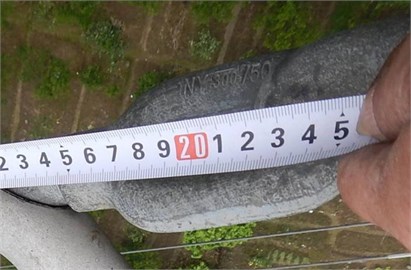
By measuring the length of the crimping terminal of the steel cap ring and the aluminum tube on the side of the iron tower, and then comparing with the design size of the steel anchor, it is also possible to determine whether the crimping position at the groove is accurate. The on-site inspection is shown in Fig. 4. Selecting the same product that is identical to the model, batch, and manufacturer of the steel cap in the transmission line can also be used to determine whether the crimping position at the groove is accurate. Steel anchor comparison shown in Fig. 5, the steel anchor has a groove that is not crimped into place. The aluminum casing is hydraulically crimped by the side of the wire and the side of the steel anchor ring. The two can be detected by using a vernier caliper to measure the margin, and then compared with the calculation formula of DL/T5285-2013. This method can judge the quality of crimping and the on-site inspection is shown in Fig. 6. In order to check whether the aluminum casing and the steel anchor have defects in “small generation” or “big generation”, the steel printing numbers on the two bodies can be compared. For example, if the steel stamp number matches the model of the wire in operation, it can be judged as no defect, otherwise the model error can be judged. Fig. 7 shows the steel anchor steel stamp.
Fig. 3Ultrasonic inspection of the thickness of the aluminum layer on the crimping surface
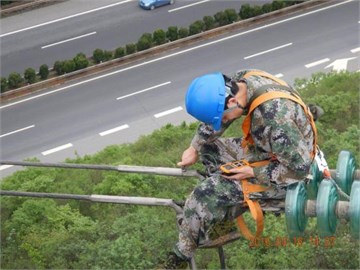
Fig. 4Length measurement of steel anchor ring and crimp terminal
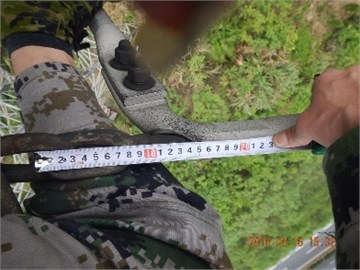
Fig. 5Steel anchor comparison
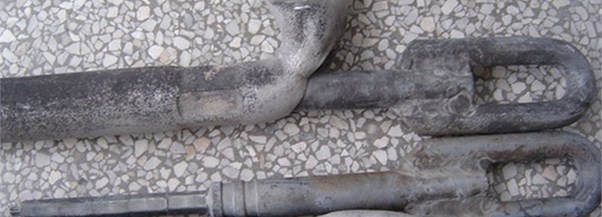
Fig. 6Aluminum casing hydraulic crimping to margin detection
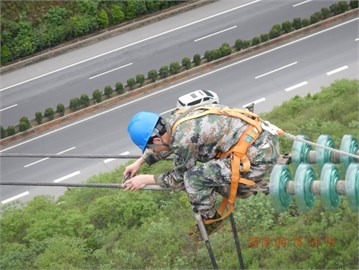
Fig. 7Steel anchor steel number comparison
4. Conclusions
This paper develops a new technology for the quality inspection of the transmission line which is important across the tensile clamp. This technology timely and accurately found a large number of defects in the quality of the tensile clamp of the transportation line, ensuring the safe operation of the transmission equipment. Therefore, it can be widely applied.
References
-
Sawada Y., Shindo Strautmane A. V. Clamping methods for tensile test of carbon fiber strand. Journal of Composite Materials, Vol. 15, Issue 6, 1981, p. 582-590.
-
Hsieh C. W. Tensile test method effect on the tensile strength of flexible PET geogrids. Geotechnical Testing Journal, Vol. 27, Issue 1, 2004, p. 11074.
-
Moraci N., Cardile G. Influence of cyclic tensile loading on pullout resistance of geogrids embedded in compacted granular soil. Geotextiles and Geomembranes, Vol. 27, Issue 6, 2009, p. 475-487.
-
Sawada Y., Shindo A., Bai Y. Clamping methods for tensile test of carbon fiber strand. Journal of Composite Materials, Vol. 15, Issue 6, 1981, p. 582-590.
-
Zhang Y. R., Ke Jia X.-U., Tang L. Q., Liu Y. P., Jiang Z. Y., Thambiratnam D. On the experimental technique for tensile test of hydrogel without clamping. Journal of Experimental Mechanics, 2017.
