Abstract
A new type of weld-necked flange (WF) joint is presented in this paper. The flange neck of the new WF joint adopts an inner-slope section with a taper angle ranged from 20° to 25°, with the flange plate being thicker than the traditional WF joint. Compared to the traditional WF joint, the bolt cluster circle of the new WF joint is reduced relative to the steel tube wall. As a result, the effect of tensile load eccentricity on the steel bolts is significantly reduced. A series of dynamic tensile tests is conducted on the new WF joint. The stiffness of the flange plate is of importance to reduce the prying force for the new WF joint. The thickness of the flange plate, which is an important parameter for the new WF joint, is investigated to study the effects on the new WF joint’s dynamic behavior. Meanwhile, the finite element model of the new WF joint is developed to study their dynamic tensile behavior. The finite element model is verified by experimental results and proved to be precise and reliable. Base on the finite element analysis, the dynamic stress distribution and contact pressure at typical locations of the new WF joints are better revealed. Afterwards, a simplified design model for the new WF joints under tensile force is proposed, which can meet the safety and economic requirements in practical engineering projects. Furthermore, the design model can provide valuable reference for the design of the new WF joints.
1. Introduction
With the development of ultra-high voltage (UHV) transmission lines, as well as the applications of multi-loop lines and large-capacity conductors, the steel transmission tower tends to be increasingly larger, and external loads also increase significantly. As a result, the traditional angle-steel tower is no longer applicable to UHV transmission lines. Due to the excellent integral rigidity, the large load bearing capacity and the small wind drag coefficient, the steel tubular tower (STT) has been widely used in UHV transmission lines and long-span transmission lines [1, 2]. Among various connection joints available for steel tubular structures, bolted flange (BF) joint is always preferred due to many advantages, such as: reliable force transmission, simple configuration, ease of on-site installation, and low maintenance requirement. BF joint is a typical plated structure, which assembles the steel tube and steel plate by welding. As shown in Fig. 1, Traditional BF joint has two types: stiffened flange (SF) joint and un-stiffened flange (USF) joint [3].
Since 1980s, many experimental and theoretical studies have been conducted on BF joints. Kato et al. [4, 5] conducted experimental investigations on USF joints for both circular hollow sections and rectangular hollow sections to study the effects of end-plate thickness. Cao J. J. [6] investigated the axial tensile behavior of on BF joints, and proposed simplified model to calculate the bolt forces and the bending moment of end plates. Igarashi S. [7] carried out tensile tests on fifteen circular BF joints, and proposed design methods with respect to different failure modes. Hoang V. L. et al. [8] performed a series of tensile tests on BF joints under monotonic loadings and cyclic loadings, and evaluated the accuracies of different design methods available in literatures. Based on the experimental results of BF joints under pure-bending, Y. Q. Wang [9] provided a simplified design model for practical use. Cao J. J. [10,17] carried out numerical simulation and theoretical analysis on BF joints to study their behaviors under lateral forces and bending moments. Yu Luan [11] studied the dynamic behaviors of BF joints, and proposed a simplified nonlinear dynamic model. J. G. Williams [12] conducted finite element analysis on externally loaded BF joints, and presented the conception of compact flange. Feras Alkatan [13] investigated the mechanical behavior of bolt assemblies, and proposed a new approach for calculating the axial stiffness of the several components. However, the investigations are mainly with respect to USF joint and SF joint. SF joint provides good rigidity and load bearing capacity, but requires tedious welding works, which results in high local residual stress and potential fatigue fracture. On the contrast, USF joint, which commonly has no stiffeners, is relatively flexible and is often used for secondary members.
The weld-necked flange (WF) joint was firstly employed in petroleum pipelines and machinery industry. The joint is attached to the steel tube by a circular full penetration weld, which can be welded by an automated welding robot in the workshop. The flange is integrally molded by forging technology, which makes the metallic crystal more compact, the material plasticity and mechanics performance are obviously improved. Compared to USF joints, WF joints provide higher rigidity and load-carrying capacity. Compared to SF joints, WF joints need no stiffeners or manual welding. The flange neck provides a smooth transition between steel tube and flange plate. As shown in Fig. 1(c), the traditional WF joints adopts an outer-slope cross-section, the flange plate is thicker than USF and SF. The traditional WF joints have been widely used in steel tubular towers in Japan and Korea, and corresponding design procedures were available in current standards. While in China, the WF joints were firstly applied in 1000 kV ultra-high voltage transmission lines from Huainan to Shanghai. Wu G. Q. [14] presented analytical model and construction requirements for traditional WF joints. Fu. K. [15] proposed simplified calculation methods based on the stress characteristics. Wu J. [16] conducted experimental studies on WF joints to verify the feasibility and security for practical applications.
Fig. 1Different types of BF joints
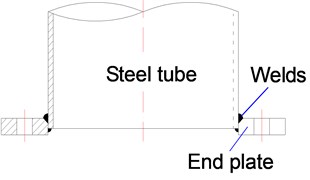
a) USF joint
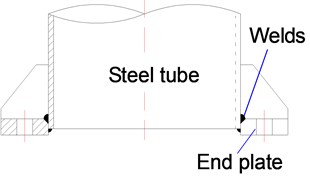
b) SF joint
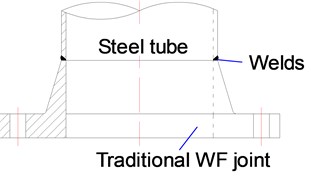
c) Traditional WF joint
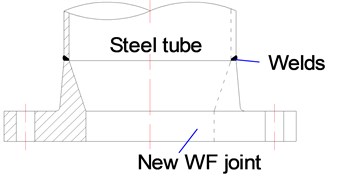
d) New WF joint
As shown in Fig. 1(d), a new type of WF joint is proposed in this paper. Compared to the traditional WF, the flange neck of the new WF adopts an inner-slope cross-section, with a taper angle ranged from 20° to 25°, and a little thicker flange plate. In this way, the bolt cluster circle can be reduced relative to the steel tube wall. As a result, the effect of tensile load eccentricity on the steel bolts is significantly reduced. From the aspects of mechanical performance, it is close to the SF joint, and the prying force does not exist between flange edges. Three new WF joints are designed and tested under axial tension to investigate their mechanical behaviors. Theoretical simulations are also conducted using ANSYS to investigate the tensile behavior of the new WF joints. The simulation results are then compared with the experimental results. The theoretical results are proved to be precise and reliable. Finally, a simplified design model for the new WF joint is proposed, which paves way for the practical applications of this new joint.
Fig. 2The new WF and connection diagram
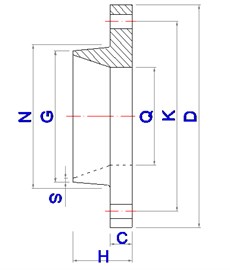
a) Flange section
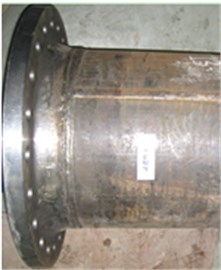
b) Flange appearance
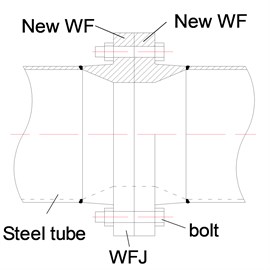
c) Connection diagram
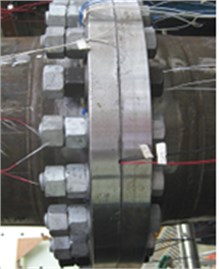
d) Connection joint
2. Dynamic experimental test
2.1. Test specimens
Three full-scale WF joints were fabricated and tested in the laboratory to investigate their behavior under axial tensile load. The steel tube, which were welded to the new WF joint by a circular full penetration welding, has an outer diameter of 356 mm and a thickness of 8 mm, as this size is very common in steel tubular towers. The detail geometric parameters of these new WF joints are shown in Table 1.
As shown in Fig. 1(c), the steel tube was connected to the new WF joint through a circular full penetration welding. The stiffness of the flange plate is of importance to reduce the prying force for the new WF joint. The thickness of the flange plate is therefore an important parameter for the new WF joint. As shown in Table 1, three flange plate thicknesses are studied. The plate thickness of F2 is determined due to design results, which will be discussed in detail later. The other two specimens (i.e., specimen F1 and F3) are used for comparative analysis. To avoid local stress concentration, the fillet radius between flange neck and plate was set as 8 mm. The steel grade for the tube is Q460 and the steel grade for the flange is Q420. High strength bolts (grade 8.8) are used to fasten the flange plates.
Table 1The detail geometric parameters of specimens
Specimen | Tube size | WF joint size (mm) | Bolt size | ||||||||
N | G | Q | K | D | C | H | S | n | d0 | ||
F1 | Ф356×8 /Ф356×8 | 370 | 358 | 300 | 430 | 478 | 30 | 100 | 10 | 20 | M24 |
F2 | 40 | 110 | |||||||||
F3 | 50 | 120 | |||||||||
The diameter of bolt holes in the new WF joint was 2 mm larger than the nominal diameter of steel bolts. The steel bolts were tightened to designed torques by a dynamometric wrench. The applied torque of M24 bolt was 280 N·m [3]. The design preloads were taken as equal to P0=Tr/(Kt·d0), in which Tr, Kt and d0 are the applied torque, the torque coefficient (= 0.25), and the steel bolt diameter, respectively. All steel bolts were equipped with two nuts and two flat washers to prevent potential loose during loading process. Meanwhile, tensile tests were carried out on the coupons, which were extracted from the tubes and flanges, with three specimens in each group. The mean values of the mechanical parameters of steel are presented in Table 2.
Table 2The material properties of coupon tests
Coupons | Thickness (mm) | Yield strength fy (MPa) | Ultimate strength fu (MPa) | Young modulus (GPa) |
Tube plate | 8 | 547 | 633 | 210 |
Flange plate | 8 | 518 | 573 | 195 |
2.2. Test set-up
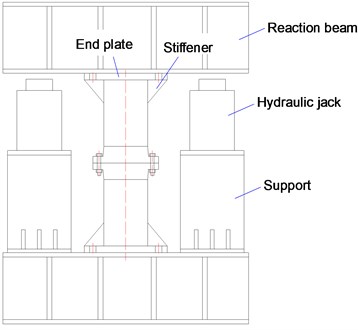
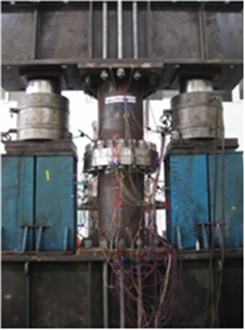
Two 40 mm-thick end plates, which were welded to the steel tubes, were used to apply tensile loads. In order to avoid local failure of the end plates, twelve 10 mm-thick stiffened plates were welded at the ends of steel tubes. The distance between the end plates and flanges was 600 mm, as depicted in Fig. 3, and the end plates were connected to the reaction beam with anchor bolts (M45) to form a self-balancing loading system. Two hydraulic jacks, with 500 t loading capacity, were employed to apply monotonic tension, and they worked well in synchronism with each other as their source of power was from the same oil channel.
Fig. 3Experimental set-up
a)
b)
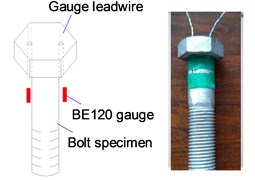
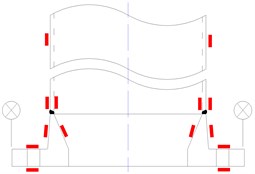
To investigate the stress variation of the WF joint, strain gauges were mounted at typical positions, such as flange plate, flange neck, tube wall near the weld toe, and mid-section of the tube. Four gauged bolts were also introduced into each connection, and two displacement transducers were placed at plate edges of each flange to measure the plate deformation. The dimension of strain gauge is 10.0 mm×4.0 mm, with maximum ultimate strain of 2 %-3 %, and the arrangement of strain gauges was shown in Fig. 4. Prior to the tests, the preloads were exerted and strains of the same location were observed to confirm the specimens were concentrically loaded. The monotonic tension was applied in increments, and each increment is equal to 4 % of the yield capacity of the steel tube. At each load increment, a data acquisition system was adopted to record the readings of strains and displacements.
Fig. 4Strain gauge placemen
2.3. Experimental results
2.3.1. Dynamic load-strain behavior of flange and steel tube
In the early stage of loading, the specimens were elastic, and no obvious deformation was observed. With the increase of dynamic tensile load, the dynamic strains at typical positions bifurcated gradually, and relatively obvious tensile deformations occurred in steel tubes. The tests were ceased once any buckling or cracking failure occurred, or the maximum measured strain reached 15000 u, as it is the maximum value the strain gauge can measure. Table 3 lists the yield capacities (Fde), which are calculated with the actual yield stress obtained from coupon tests, and average test capacity (Fte) of three WF joints, where the test capacity are the maximum load values of each WF joint. The ratio of Fte over Fde is 1.143.
Table 3The experimental results of specimens
Specimen | Tube size | Ftei (kN) | Fte (kN) | Fde (kN) | Fte / Fde | Δl (mm) | Δt (mm) |
F1 | Ф356×8 /Ф356×8 | 5500 | 5466.7 | 4781.7 | 1.143 | 6.2 | 1.08 |
F2 | 5400 | 9.6 | 0.94 | ||||
F3 | 5500 | 8.2 | 0.37 |
The measured strains represented the local deformation at strain gauge locations, and the strain development tendency can be obtained by comparing load-strain curves of typical locations, as shown in Fig. 4. Fig. 5(a) and (b) show the strain development of mid-section of the steel tube and the tube wall near the weld toe. As the flanges of all three specimens provide much higher stiffness than the steel tube, the strains of the two sections developed consistently and almost overlapped. The tube section at the conjunction with the flange (i.e., the tube wall near the weld toe) was found to be loaded concentrically and the tension strain of the outer skin developed more rapidly than the inner skin. As the centroids of the steel tube and the flange were not collinear, bending moment were developed on this section. Due to the local bending moment, this section is the crucial part of the whole joint.
As shown in Fig. 5(c), the flange neck is also under the local bending moment, and the tension strain of the outer skin (i.e., point B in Fig. 5(c)) developed more rapidly than the compression strain of the inner skin (i.e., point A in Fig. 5(c)). In addition, the tension strain at the outer skin of F1 tends to be larger at the same tension load than that of F2 and F3. The reason lies that the prying force of flange plate of F1 may result in additional moment on flange plate and flange neck. Fig. 5(d) shows the strain development of flange plate, the plate of F2 and F3 remained elastic and the strains developed almost linearly, while the measured strain of F1 developed more rapidly, and the plate have already reached the yield status.
After the tests, the residual elongations of steel tubes (Δl) were measured and recorded, as shown in Table 3. The residual deformation of steel tube was 6.2 mm in F1, 9.6 mm in F2 and 8.2 mm in F3, with the mean value of 8.0 mm. The steel tubes tested show good ductility.
Fig. 5The load-strain development of typical positions
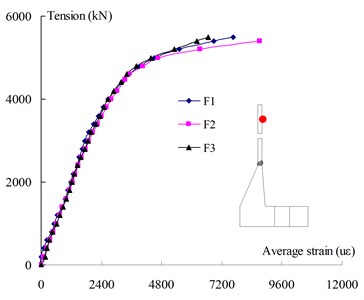
a) The load-strain curves of mid-section of steel tube
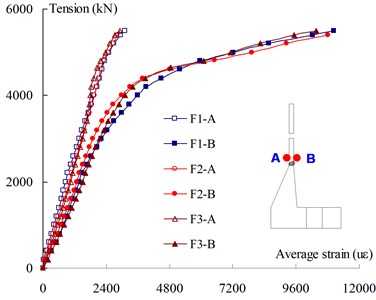
b) The load-strain curves of tube near weld toe
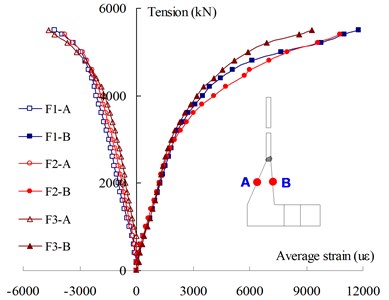
c) The load-strain curves of flange neck
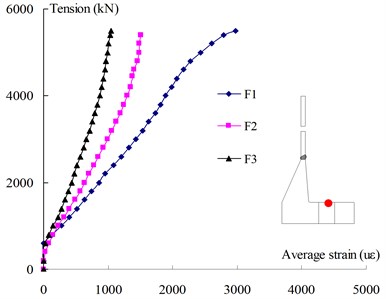
d) The Load-strain curves of flange plate
2.3.2. Flange plate deformation
As discussed above, the stiffness of the flange plate is of importance to reduce the prying force of the new WF joint. The thickness of the flange plate is therefore an important parameter for the new WF joint. In this study, the three full-scale WF joints have different flange plate thicknesses. When the steel tube reached the yielding status, the outer edge of flange plates of F2 and F3 were separated, and the paper scraps could be inserted into plate gap, as shown in Fig. 6(a). In the figure, the deformations of finite element models are also put forward, and the detail analysis procedure are described in Section 3. However, the plates of F1 were contacted through the testing procedure. It means that the prying action exists in F1, and does not exist in other two specimens. The conclusion should be considered in design model.
After the tests, the residual deformations of flange plates (Δt) were also recorded in Table 3. The residual plate deformations are 1.08 mm, 0.94 mm, and 0.37 mm for F1, F2 and F3, respectively. It is obvious that the residual deformation tends to be smaller with the increase of flange plates, and the new WF joints tested provide good stiffness.
2.3.3. Dynamic load-strain behavior of connection bolts
Fig. 7 shows the typical load-strain curve of steel bolts for all specimens, the bolt response was essentially linear, and the strain of inner side of bolt shank developed more rapidly than that of outer side. It is obvious that the connection bolt is under local bending moment. The measured strains of steel bolts could be converted into bolt force (TB1), and the equivalent bending moment (MB1), as listed in Table 4. As expected, the equivalent moment also tends to be smaller with the increase of plate thickness.
After the tests, no obvious failure or fracture was observed for the steel bolts, except a slight bending deformation in the bolts of F1, as shown in Fig. 6(b). The experimental results show that the new WF joints and the steel bolts are reliable, which can meet the requirements of practical engineering projects.
Table 4The comparison between bolt force and moment obtained from FEA and test
Specimen | Bolt size (mm) | Test result | FEA result | TB/TB1 | MB/MB1 | |||
TB1 (kN) | MB1 (kN·m) | TB (kN) | MB (kN·m) | Contact stress (MPa) | ||||
F1 | 24 | 335.3 | 1.08 | 342.4 | 0.97 | 285.7 | 1.021 | 0.898 |
F2 | 285.7 | 0.74 | 283.5 | 0.67 | 3.87 | 0.992 | 0.905 | |
F3 | 275.9 | 0.53 | 278.4 | 0.44 | 0 | 1.009 | 0.830 | |
Fig. 6The comparisons of deformation of flange plates and connection bolts
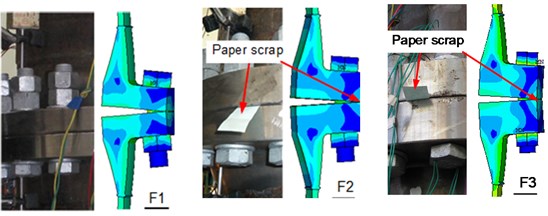
a) The deformation of flange plates
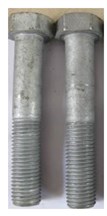
b) Deformation of bolt
Fig. 7Load-strain curves of connection bolts (F2)
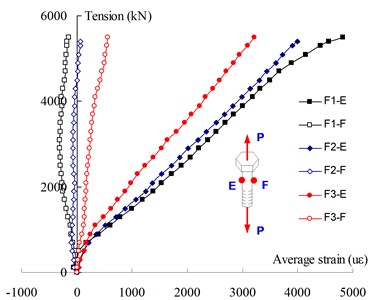
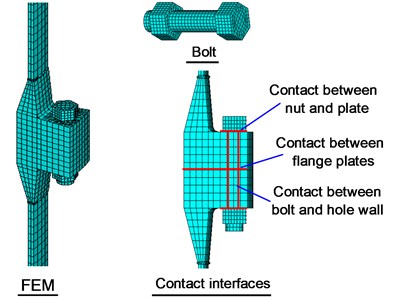
Fig. 8The strain development of bolts
3. Numerical simulations
3.1. Finite element model
Theoretical analyses were conducted using ANSYS. The steel material of steel tubes and flanges was modeled by an ideal elasto-plastic tri-linear model, which is often used for the simulation of structure steel, with mechanical properties obtained from coupon tests, and the tangent modulus E0 was taken as 10 % of the Young’s modulus E. The isotropic hardening model was used in the post yield range.
In the FE model, the bolts, flanges, and steel tubes were modeled by eight-node SOLID185 element. The surface-to-surface contact algorithm was employed to simulate the interaction between all possible contact surfaces of flange plates, bolt nuts, bolt shanks and bolt holes. The target element TARGE170 coupled with contact element CONTA174 were used to simulate contact pairs, and friction coefficient of the contact interfaces was taken as 0.25 [3]. The equivalent temperature method was introduced to simulate the preloads in connection bolts, and the expansion thermal coefficient was set as 1.2×10⁻⁵/°C.
The analytical model was then created, as shown in Fig. 8. Taking advantage of spatial symmetry, the flange could be divided into several sectors in the circumferential direction. The flange separation model was selected to reduce computing time and storage space. The arc-length method, together with modified Newton-Raphson method, was used to accelerate numerical solution convergence.
3.2. FEA results
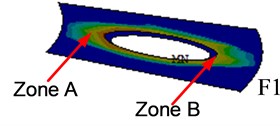
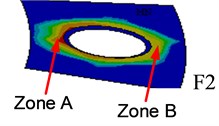
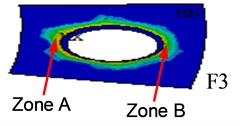
As the bolt cluster circle and the tube wall didn’t overlap, the extra bending moment existed on flange plates. The contact pressure between flange plates was extracted from analytical models, as shown in Fig. 10, which could not be measured in the full-scale experimental tests. The simulated contact stresses between outer edges of flange plates of the three specimens are 285.7 MPa, 3.87 MPa, and 0. It means that some degree of prying force did exist between the flange plates of F1, and the prying force of F2 is negligible small. These show a similar trend with the experimental deformation of flange plates, as shown in Fig. 6. The prying force distributed uniformly at the outer edges of flange plates, and it leads to additional tension and moment on steel bolts.
Fig. 9The contact status between nut and flange plate
a)
b)
c)
Fig. 10The contact status between flange plates


Fig. 11The dynamic stress distribution on bolt shanks
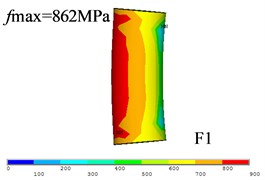
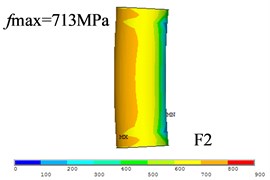
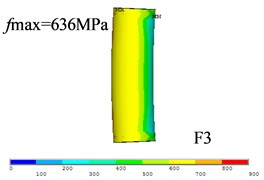
Fig. 9 displayed the contact status between bolt nut and flange plate, the contact stress between nut inside and flange plate (i.e., zone A in Fig. 9) is much bigger than that of outside (i.e., zone B in Fig. 9). Fig. 11 shows the stress distribution of bolt shanks of three WF joints, and the maximum stimulated stress are 862MPa, 713 MPa, and 636 MPa. The simulated bolt stress could be converted in a linear elastic way to simulated tension (TB) and equivalent moment (MB). As shown in Fig. 12, TB and MB of connection bolts tends to be smaller with the increase of plate thickness. The comparisons between test results and FEA results show good agreement as shown in Table 4.
The FEA results were proved to be precise and reliable. With the help of FE models, an in-depth understanding on the tensile behavior of the new WF joints can be achieved, and a wide range of numerical calculations can then be used to create a simplified design model.
Fig. 12The development of simulated tension and moment of each configuration
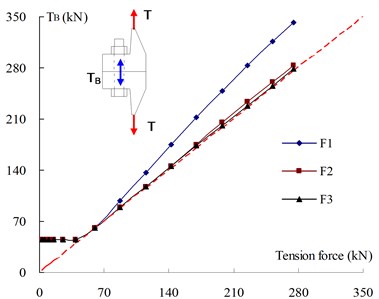
a) Bolt tension
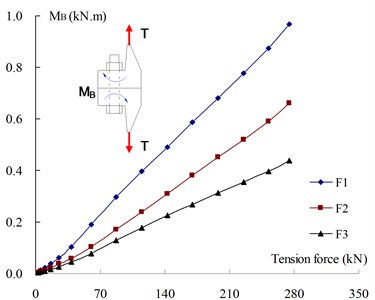
b) Bolt moment
4. Design procedure
4.1. Basic assumption
The experimental and numerical investigations presented are with the objective to propose a simplified design model for the new WF joint. The design procedure herein is based on the assumptions listed below:
a) The flange should be designed with higher capacity and rigidity than the steel tube which it splices;
b) In order to mitigate the effects of bending moment, the WF joint adopts inner-slope section, and the bolt cluster circle reduces relative to the steel tube wall.
c) The flange plate of the new WF joint is thicker than the traditional WF joint, and prying force does not exist at plate outer edges. The experimental results indicate that a thicker plate can help to reduce the additional tension due to prying force between flange plates and bending moment on bolts.
d) The connection bolt is assumed to be axially loaded, and the sum of steel bolts’ tensile force is equal to the tension of corresponding tube section.
e) The effect of circular penetration weld is not considered in the design model. It is therefore required that the full penetration weld should be employed between flange and tube, and the weld should provide equal or higher strength than the steel tube.
4.2. Design model
According to the basic assumptions listed above, a simplified design model can be proposed due to the force characteristics of each flange separation. There are three fundamental steps in the design procedures. Firstly, calculate the bolt number and size based on the tension of steel tube. Secondly, determine the geometric dimension of flange plate. Thirdly, determine the geometric dimension of flange neck.
4.2.1. Design of flange plate
For the new WF joint, the flange plate has good local stiffness and works as a cantilevered beam with a concentrated load acted at mid-span. To simplify the calculation formula, the flange plate is divided into several sectors in the circumferential direction, which has a steel bolt hole. Fig. 13 describes the force mechanism of each plate sector schematically. TB0, the tension of a connection bolt, can be given by Eq. (2), Where T is the tensile capacity of steel tube, n is the number of the connection bolts:
The arc length Sd of each tube section can be expressed by Eq. (2), where d is the outer diameter of steel tube:
As shown in Fig. 13, each plate separation is mainly subjected to bolt force TB0, radial moment Mr, and tangent moment Mt. The equilibrium moment equation can be established as Eq. (3). Due to calculation results of tiny deformation theory of elastic annular plate [18-23], Mt can be expressed by r×Mr, where r can be taken as 0.3. Eq. (3) can be converted into Eq. (4):
Then, the thickness of flange plate, C, can be determined by:
Fig. 13The force diagram of flange plate separation

4.2.2. Design of flange neck
To simplify the design procedure, the flange can be divided into two halves, and each half is mainly subjected to tube tension (T/2), bolt force (T/2) and bending moment (M0), as depicted in Fig. 14. For each flange separation, the equilibrium equation can be expressed as [24-27]:
where yt is the force arm of tube tension, and yb is the force arm of bolt force. They can be given by:
K is the diameter of bolt pitch circle, and Eq. (6) can be written as:
Fig. 14The force diagram of flange separation

Fig. 15The sectional centroid of flange cross-section
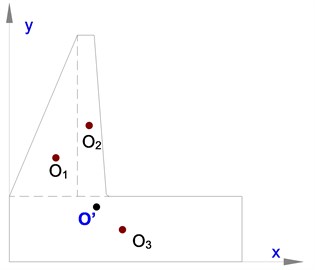
For the new WF joint, the cross section can be divided into three parts (Fig. 15), and the sectional centroid can be determined as:
The sectional inertia moment Iy and sectional modulus Wy can be derived as:
Then, the flange sectional stress σf can be written as:
4.3. Design procedure
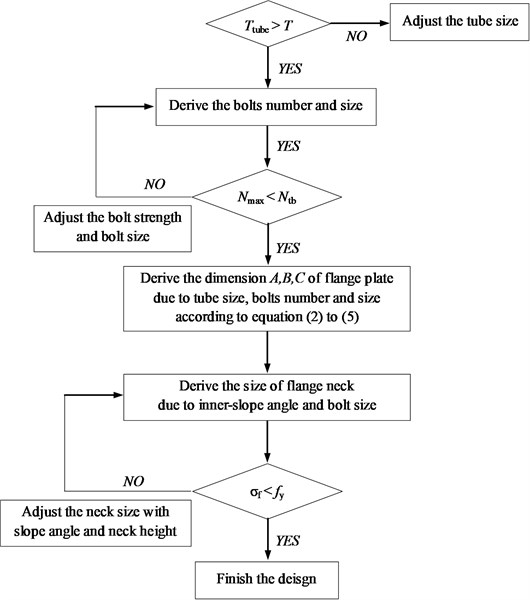
Based on the above two simplified design models for flange plate and flange neck, a practical design procedure is proposed here, as shown in Fig. 16. It should be noticed that the procedure is based on the basic assumptions described in Section 4.1. Above all, the new WF joint adopts inner-slope section, and the prying force does not exist at plate outer edges.
For the three new WF joints, the detail dimensions of F2 are calculated according to the design procedure; the other two joints are used for comparative analysis and verified the rationality of the method. The experimental and numerical investigations indicate that when the steel tube reach the yielding status, the plates of F1 were contacted through the test, while the plates out-edge of F2 and F3 were separated, it means the prying force does not exist between the flange plates, proving the accuracy of the model.
Fig. 16Design procedure
5. Conclusions
Based on the experimental and numerical investigation, the following conclusions can be made:
The new WF joint proposed herein adopts inner-slope section for the flange neck, and the bolt cluster circle reduces relative to the tube wall. The experimental results show that, when the steel tube reach the yielding status, the plates out-edge of F1 are found to be contacted, and the plates of F2 and F3 are separated. It means the prying force exists in F1 and does not exist in other two joints.
For each WF joint tested, the tube sections adjacent to circular penetration welds are found to yield at first. It should be noticed that this section is the crucial part of the joint and should be paid more attentions. While the flange plates remain elastic, the flange joints can meet the safety and economic requirements in practical engineering projects.
The FE models of flanges are created to simulate the tensile behavior, and the FEA results agree well with the test results. With the help of FE models, an in-depth understanding on the tensile behavior of the new WF joints can be achieved, and a wide range of numerical calculations can then be used to create a simplified design model.
The connection bolts are found to be loaded eccentrically, and the equivalent moments tend to be smaller with the increase of plate thickness. While in the design model, the bolts are assumed to be loaded concentrically, so the bolts should be given more safety margin.
The basic assumption is proposed, and the simplified design model is developed. The design procedures can be divided into three steps, and the connections designed provide good rigidity and bearing capacity. The dimensions of F2 are designed due to the design model, and the experimental and numerical investigations prove the accuracy of the model. The theoretical model herein can provide useful reference for the new WF joint.
References
-
Zhang Z. F., Mo Z. L., Li Q. H. Structural design and experimental investigation of steel tubular tower for six-circuit on same tower transmission line. Power System Technology, Vol. 34, Issue 2, 2010, p. 205-210.
-
Yang J. B., Han J. K., Li M. H., Li F. Selection of calculation model for steel tubular tower of UHV power transmission line. Power System Technology, Vol. 34, Issue 1, 2010, p. 1-5.
-
DL/T 5154-2012. Technical code for the design of tower and pole structures of overhead transmission line. China Planning Press, Beijing, 2012.
-
Kato B., Hirose R. Bolted tension flanges joining circular hollow section members. Journal of Constructional Steel Research, Vol. 5, Issue 2, 1985, p. 79-101.
-
Kato B., Mukai A. Bolted tension flanges joining square hollow section members. Journal of Constructional Steel Research, Vol. 5, Issue 3, 1985, p. 163-177.
-
Cao J. J., Bell A. J. Determination of bolt forces in a circular flange joint under tension forces. International Journal of Pressure Vessels and Piping, Vol. 68, Issue 1, 1996, p. 63-71.
-
Igarashi S., et al. Limited design of high strength bolted tube flange joints, Part 1. Joint without rib-plates and ring-stiffeners. Journal of Structural and Construction Engineering, Vol. 354, 1985, p. 52-66.
-
Hoang V. L., Jaspart J. P. Demonceau J.F. Behavior of bolted flange joints in tubular structures under monotonic, repeated and fatigue loads I: Experimental tests. Journal of Constructional Steel Research, Vol. 85, 2013, p. 1-11.
-
Wang Y. Q., Zong L., Shi Y. J. Bending behavior and design model of bolted flange-plate connection. Journal of Constructional Steel Research, Vol. 84, 2013, p. 1-16.
-
Cao J. J., Packer J. A. Design of tension circular flange joints in tubular structures. Engineering Journal, First Quarter, Vol. 68, 1997, p. 63-71.
-
Yu Luan, Zhen Qun Guan, Geng Dong Cheng, Song Liu A simplified nonlinear dynamic model for the analysis of pipe structures with bolted flange joints. Journal of Sound and Vibration, Vol. 331, 2012, p. 325-344.
-
Williams J. G., Anley R. E., Nash D. H., Gray T. G. F. Analysis of externally loaded bolted joints: Analytical, computational and experimental study. International Journal of Pressure Vessels and Piping, Vol. 86, 2009, p. 420-427.
-
Feras Alkatan, Pierre Stephan, Alain Daidie, Jean Guillot Equivalent axial stiffness of various components in bolted joints subjected to axial loading. Finite elements in Analysis and Design, Vol. 43, 2007, p. 589-598.
-
Wu G. Q., He C. H., Geng J. D., Shen H. B., et al. Research on bolt calculation in Forging flanges used in steel tube tower. Electric Power Construction, Vol. 30, Issue 10, 2009, p. 1-5.
-
Fu K., Zhang K. B., Ni Y., Xue W. C. Research on calculation methods in high-neck flange. Special structure, Vol. 28, Issue 6, 2011, p. 67-75.
-
Jing Wu, Zhang D. C., Wu J. B., Wu G. Q. Test study on high-neck forging flange of UHV steel tube transmission towers. Journal of Building Structures, Vol. 21, Issue 2, 2009, p. 153-158.
-
Cao J. J., Bell A. J. Experimental study of circular flange joints in tubular structures. Journal of Strain Analysis, Vol. 31, Issue 4, 1996, p. 259-267.
-
Practical Handbook of Static Calculation of Building Structures. China Building Industry Press, Beijing, 2009.
-
Yang K., Yang J. Performance analysis of DF cooperative diversity system with OSTBC over spatially correlated Nakagami-m fading channels. IEEE Transactions on Vehicular Technology, Vol. 63, Issue 3, 2014, p. 1270-1281.
-
Du J., Xiao P. Design of isotropic orthogonal transform algorithm-based multicarrier systems with blind channel estimation. IET Communications, Vol. 6, Issue 16, 2012, p. 2695-2704.
-
Hu H. G., Wu J. S. New constructions of codebooks nearly meeting the Welch bound with equality. IEEE Transactions on Information Theory, Vol. 60, Issue 2, 2014, p. 1348-1355.
-
Wei W., Fan X., Song H., et al. Imperfect information dynamic stackelberg game based resource allocation using hidden Markov for cloud computing. IEEE Transactions on Services Computing, 2016, https://doi.org/10.1109/TSC.2016.2528246.
-
Ge C., Sun Z. L., Wang N., et al. Energy management in cross-domain content delivery networks: a theoretical perspective. IEEE Transactions on Network and Service Management, Vol. 11, Issue 3, 2014, p. 264-277.
-
Wei W., Song H., Li W., et al. Gradient-driven parking navigation using a continuous information potential field based on wireless sensor network. Information Sciences, Vol. 408, 2017, p. 100-114.
-
Xiao P., Wu J. S., Sellathurai M., et al. Iterative multiuser detection and decoding for DS-CDMA system with space-time linear dispersion. IEEE Transactions on Vehicular Technology, Vol. 58, Issue 5, 2009, p. 2343-2353.
-
Luo Q. L., Fang W. Reliable broadband wireless communication for high speed trains using baseband cloud. EURASIP Journal on Wireless Communications and Networking, Vol. 2012, 2012, p. 1-12.
-
Wei W., Song H., Wang H., et al. Research and simulation of queue management algorithms in ad hoc network under DDoS attack. IEEE Access, 2017, https://doi.org/10.1109/ACCESS.2017.2681684.

