Abstract
The continual development of technologies helps in expanding the scope of using them in various industry types. One of the most rapidly developing fields, in which vibrothermography is used, is the field of monitoring technical objects [1, 2]. Determination of the intensiveness of heat phenomena present during the work of machines may be very useful for evaluating their performance [3-5]. The analysis of thermal images may be a rich source of information on the technical condition of the machine, the quality of work and the assembly of kinematic pairs that constitute the heat load of the bodies. Diagnostic with the usage of vibrothermography enables an accurate indication of the defectively functioning elements of machines and devices, as well as performing efficient repairs without the unnecessary replacement of the properly functioning parts [6]. It also helps in creating optimum working conditions and energy usage of those devices. It is especially significant for the bearing elements of toothed gears, in which the relative rotational motion results in generating a high amount of heat due to friction of cooperating elements. This elaboration has presented the usage of thermography technologies for identification and documentation of temperature distribution values in heat loads of toothed gear subassemblies. An analysis of the acquired thermograms has been conducted with the dedicated software FLIR ThermaCAM Researcher.
1. Introduction
The usage of thermography technologies in diagnostics is possible thanks to the discovery made by a German scientist, Max Ernet Ludwig Planck, who quantitatively described the spectral character of electromagnetic radiation and determined the spectral density of energy luminous emittance of radiation generated by a perfectly black object as the function of wave length and temperature [7].
The discovery made by Max Planck and the technological development in construction of measuring devices resulted in the fact that nowadays thermograph is claimed to be one of the most desirable diagnostic and observation methods in energetics, construction, metallurgy, environment research and many other fields [8-10]. It is connected with a set of advantages that the measuring systems based on thermal analysis of the tested objects have. One of such significant advantages is the non-contact measurement of the analyzed objects, which in the majority of uses is the most important criterion whether thermography technologies will be used.
On the basis of Planck’s law, the power emitted by the surface of the analyzed object for a particular wave length depends on the temperature of this object, which enables measuring the temperature of the analyzed object by measuring the power emitted by its surface, in particular within the infrared spectrum.
The devices that are used to measure the power emitted by the surface of the analyzed objects are called thermovision cameras and they consist of optical system, infrared radiation detector with proper cooling system, and an electronic line of enhancing, processing and visualization [11].
The basic and important kinematic pairs in a toothed gear are in gear components and bearings. Related to them degradation processes and energy losses occur as a result of friction and increase with the load, so with the increase of the transferred power [12]. The possible forms of damage are i.e. dry-run of bearings, overheating of cooperating elements or abrasive wear.
Very often the producers of toothed gears, under the risk of losing warranty, prohibit fixing to them thermocouples and accelerometers (used in friction diagnostics), for which the best efficiency is reached by screwing them with bolts in the openings carved in the casing of the bearing. In such case, the possibility of contactless measurement may be a worthwhile alternative diagnostic method. An additional advantage of diagnostic based on vibrothermography is the possibility of conducting measurement during the work of the device in its actual operational conditions.
The analysis of thermal images may provide information about the technical condition of the gear, the quality of work and the assembly of kinematic pairs that constitute the heat load of the bodies. If the working bearing is in good technical shape, the heat will be carried in a proper way and, consequently, the distribution of temperature on its surface is regular. However, if the thermograph images show areas the temperature of which is higher than in other elements, or the temperature of the bearing is unnaturally high, it may mean that there is increase friction in those places.
2. Laboratory tests
The analyses were performed under laboratory conditions in a test stand constructed at the Department of Machine Construction and Usage of the University of Science and Technology. Laboratory tests are to confirm the possibility of using thermography technologies in diagnostics of toothed gear. They were conducted in the test stand presented in Fig. 1.
Fig. 1Scheme of the test stand

The design of the stand allowed to perform tests with the usage of non-contact vibrothermography and measurements performed by detectors fixed in a specially carved openings in the body of the toothed gears and engine.
The laboratory stand prepared in order to perform the measuring tasks consisted of an electric engine 1 with Sg90S2 code and the following rating: power 1.5 kW, velocity 2840 1/min. The work of the engine was controlled with a frequency inverter 2 with FR-S520SE-1.5K-EC code. The electric engine 1 was directly connected via clutch 3 with ROTEX 19 code with the bevel-helical gear 4 with code SK11EW and the following parameters: torque 6.9 Nm, gear ratio 1.35. The bevel-helical gear 4 was connected by a firm studded clutch 5 with a worm drive gear 6 with 8CN20 code and parameters: power 5.5 KM (4.045 kW), gear ratio 25. The output shaft of the worm drive gear 6 was connected by a disc brake 7 constituting the load of the whole drive system. The load of the system was referred to operational conditions of the engine, in which the reference point of the used load was the nominal power of the engine at the used speed. The rotational speed of the output shaft from the engine was measured with tachometer 8 of type 2981 – CCLD laser tacho probe.
In the research, a thermovision camera of Flir T335 type was used; due to its design, this camera is a portable device that allows a non-contact, remote measure of temperature on the analyzed object without the need for having and installing additional equipment. The most important technical parameter of the camera used for the tests is thermal sensitivity (NETD), which determines the accurateness of the measurements in various conditions of imaging. The Flir T335 camera used in the tests is characterized by a high thermal sensitivity that is not higher than 0.05 °C. The camera used is facilitated with a microbolometer non-cooled sensor with a resolution of 320×240 pixels, which provides a satisfying quality of the created images for further analysis. The camera will enable measurement with accuracy of temperature measurement of ±2 % and the possibility of setting various parameters concerning images, measurements and alerts.
Before performing the measurement, a correction of settings was implemented in the thermovision camera concerning the temperature of the surroundings, temperature of the air, air humidity, distance from the analyzed object and the emissivity that has been assumed for the analyzed object. Moreover, in order to achieve the highest thermal resolution and accurateness of the measurements, from the available options of the camera, the measurement spectrum from –20 °C to 120 °C was chosen for the assumed change of temperature.
On the presented laboratory stand, there is a possibility of performing measurement analyses for various working conditions connected with setting alignment and misalignment, and the soft foot state of the cooperating devices. For instance, the measurements were performed for the following working conditions: 1. A system without damages, aligned, 2. Misalignment: electric engine – toothed gear, 3. Misalignment: toothed gear – worm drive gear, 4. Misalignment: Electric engine – Toothed gear – Worm drive gear, 5. Soft foot: electric engine, toothed gear in work conditions when the system is aligned or misaligned.
Due to the very wide scope of vibrothermography tests that were performed at the research stand, this elaboration has been limited to the selected working conditions that enable, in the author's opinion, identification of the problem concerning the diagnostics of the toothed gear with the usage of thermograph technologies. Bearing this in mind, tests for selected working conditions have been performed: misalignment electric engine – toothed gear with load of 90 % of the rated value of the engine. All the measurements were performed for the rated speed of the engine amounting to 2840 1/min.
3. Research results
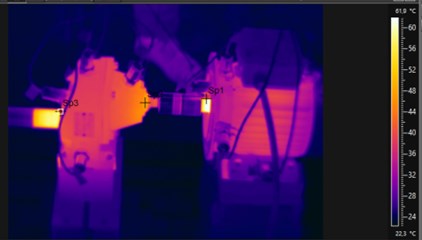
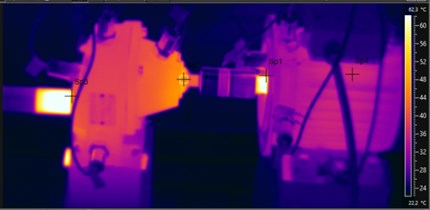
The acquired test results have been presented on thermograms constituting the thermal image of the analyzed bearings of the bevel-helical gear PZ, Figs. 2 and 3.
Fig. 2Test results for an overloaded toothed gear in an aligned work system of the shaft axle

Fig. 3Test results for an overloaded toothed gear in a misaligned work system of the shaft axle

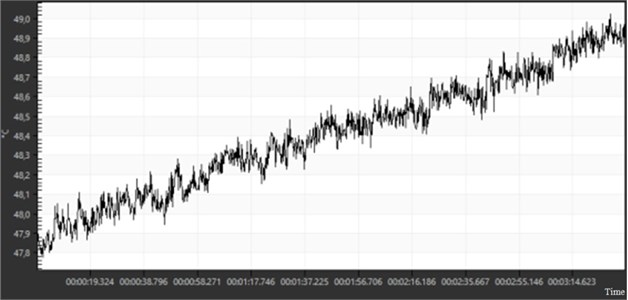
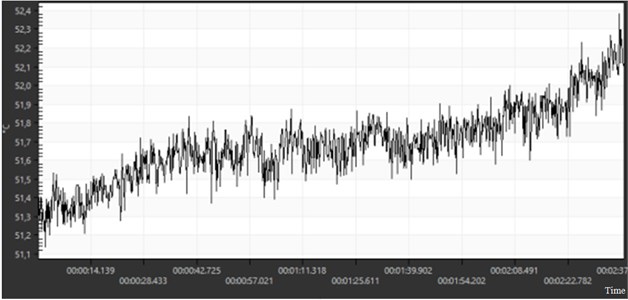
In order to more properly present the changes occurring in the analyzed bevel-helical gear in the analyzed conditions, a comparison has been made for the test results for an overloaded toothed gear in an aligned and misaligned work system of the shaft axle of the engine in the same load of the bearing. The results have been shown in Fig. 4 and Fig. 5.
Fig. 4Vibrothermography test results for an overloaded toothed gear in an aligned work system of the shaft axle of the engine

Fig. 5Vibrothermography test results for an overloaded toothed gear in a misaligned work of the shaft axle of the engine

4. Analysis of the research results
In order to analyze the distribution of temperatures, the computer program FLIR ResearchIR has been used. This program allows processing of the images made with the thermovision camera, an analysis of the image area chosen by the user, and reading of the temperature in every point of the thermogram.
On the basis of the research results for the toothed gear that is overloaded and works in an aligned work system of the shaft axle of an electric engine and bevel-helical gear, Fig. 2, and the same gear, but working in a misaligned system of the shafts, Fig. 3, it can be noticed that there has been an increase in temperature of the working bearings caused by misalignment of the shaft axle of the electric engine and the bevel-helical gear. It can be vividly notices in Fig. 4 and Fig. 5 which presents in a chosen point of distribution vibration signal of temperature of the analyzed toothed gear during the tested work time of the drive system. One may notice here a distinguishable translation vector 3 °C for the working temperature of the bearing in an aligned operating system of shaft axle, and the temperature of the operating bearing caused by implementation of a state of misalignent of the shaft axle.
5. Conclusion
Vibrothermography devices are more often used for diagnostic purposes and for controlling the working process of machines and energy devices. The possibilities they give are relatively big in comparison to the price of the vibrothermography devices themselves. By using vibrothermography devices, we are able to directly diagnose worrying symptoms on a working gear, e.g. a significantly increased temperature of the working bearings caused by the incorrect state the gear operates in. This causes increased resistances of the motion of rotational elements and increases usage of power supplied to the drive system. An earlier diagnosis, by using vibrothermography technologies, of defectively functioning parts, e.g. bearings, enables performing an effective action and correction of shaft misalignment or, if necessary, repairing only the damaged element without unnecessary replacement of the properly functioning gear.
This elaboration has presented a simple method of an initial analysis of the state of bearings with the usage of vibrothermography technologies. However, the presented research methodology may also be used to evaluate the state of work of other elements of the drive, i.e. engines and clutches.
The elaborated method may be used in diagnostics and utilization of practical construction solutions, when the classic mechanic or other methods are difficult or impossible to be implemented.
The acquired results justify conducting further research with the usage of vibrothermography technologies and elaboration of an accurate mathematic model of transfer of heat that would include the mechanism for transporting heat.
References
-
Maldague X. Theory and Practice of Infrared Technology for Nondestructive Testing. Wiley, 2001.
-
Lepiarczyk D. Use of infrared mapping to protect the natural environmental resources used in production and operation of mechanical machines and devices. Polish Journal of Environmental Studies, Vol. 21, Issue 5A, 2012, p. 276-280.
-
Lepiarczyk D., Gawędzki W., Tarnowski J. Laboratory stand for tests of slide bearings based on heat balance. Tribologia: Teoria I Praktyka, Vol. 1, 2012, p. 85-91.
-
Albatici R., Tonelli A. M. Infrared thermovision technique for the assessment of thermal transmittance value of opaque building elements on site. Energy and Buildings, Vol. 42, 2010, p. 2177-2183.
-
Maldague X. Theory and Practice of Infrared Technology for Nondestructive Testing. Wiley, 2001.
-
Beier K., Gemperlein H. Simulation of infrared detection range at fog conditions for enhanced vision systems in civil aviation. Aerospace Science and Technology, Vol. 8, 2004, p. 63-71.
-
Wiśniewski S. Heat Exchange. WNT, Warszawa, 1997, (in Polish).
-
Lepiarczyk D. The usage of thermo-vision in estimating the quality of thermo-modernization of residential buildings. Polish Journal of Environmental Studies, Vol. 23, Issue 3A, 2014, p. 67-72.
-
Lepiarczyk Uhryński D. A. Thermo-vision analysis of iron foundry production process concerning secondary usage of heat. Polish Journal of Environmental Studies, Vol. 23, Issue 3, 2014, p. 1017-1023.
-
Pieczonka L., Aymerich F., Brożek G., Szwedo M., Staszewski W. J., Uhl T. Modelling and numerical simulations of vibrothermography for impact damage detection in composites structures. Structural Control and Health Monitoring, Vol. 20, Issue 4, 2013, p. 626-638.
-
Więcek B., Mey G. Thermo-Vision in Infrared: Basis and Usage. PAK, Warszawa, 2011, (in Polish).
-
Lepiarczyk D. Use of infrared mapping to protect the natural environmental resources used in production and operation of mechanical machines and devices. Polish Journal of Environmental Studies, Vol. 21, Issue 5A, 2012, p. 276-280.
