Abstract
The paper presents a concept for the construction of an inspecting-sorting automatic machine for pharmaceutical glass packaging. Results of testing quality parameters of vials on a test stand are discussed in the main part of the article. The possibility of analyzing all possible quality parameters of vials in the CCD measurement system was pointed out. Moreover, a scheme of the flow of vials through inspection points used during testing was presented as well as a mathematical analysis was made of selected design issues of the inspecting – sorting machine that allows inspection of the whole area of a pharmaceutical glass packaging. The results of the research were applied to the construction of transport elements of an inspecting – sorting machine for products designated for the pharmaceutical and medical industry.
1. Introduction
The development of science and technology in the end of the 20th century has resulted in replacing, partially and in some cases totally, human workers with machines and technological equipment, which operate according to the prescribed algorithms. Such a replacement of the human labour by robots performing cyclic tasks requires specified precision and repeatability with prescribed accuracy [1, 2].
The necessity of constant supervision of operations is an extremely important aspect of robotization of manufacturing processes and inspection processes. The operations of robots can be easily monitored and controlled by assigning proper technical, geometrical, technological and quality parameters [3, 4].
In each case of manufacturing, control of quality parameters is of crucial importance. The feedback contained in the loop: measurement – classification – repair, secures quality control of a product and constant supervision of the correctness of the manufacturing process [5, 6, 7].
An important issue is the way a product is measured and inspected and which techniques are used depending on the characteristics of the manufacturing process and the use of the product (contact with a human organism). It is of great importance to make a decision about the type of control which would force the use of required technical means including robots for taking measurements and inspecting-sorting automatic machines [8].
The tasks which must be tackled while planning a secure quality control process involve: the use of the available means of measurement and control, selection of the most appropriate measurement method securing an objective readout in prescribed time, selection of measuring devices [9] (economic, precise, reliable), selection of auxiliary instrumentation, selection of a proper robot with parameters that allow performance of the control process, formulation of economical principles relating to the time of labour, time of control and energy consumption [8, 10, 7].
From the point of view of robotics, it is of great importance to select geometrical parameters of the path resulting from constraints which take into consideration the complexity of the shape of an object being inspected, its accessibility during the measurement of quality parameters at the prescribed time of shift and control [11].
The determination of shifts and energy expenditure in the process of effector’s movement affect to a large extent the feasibility of prescribed time of measurement and the costs of control operations [12, 13, 14].
The problems referred to above in an obvious way indicate the impact of various factors on the manner in which control is performed and the result. Each of them must be defined precisely (and considered) while making a decision about automation and robotization of quality control of products of various applications (pharmaceutical industry, medical industry, e. g., implants) [15].
2. Tasks of the inspecting – sorting automatic machine
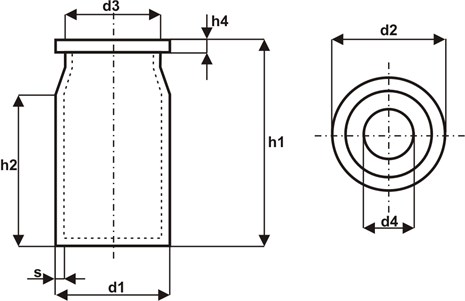
Pharmaceutical vials of various dimensional parameters are produced in Neuhaus (Germany). According to the ISO 9000 standards, technological regime requirements must be satisfied in order to maintain the prescribed quality parameters. Taking into consideration the character of production (mass and serial production) and the requirement of maintaining the prescribed quality in 100 % of the production, an analysis was made on the possibility of employing a CCD camera for inspecting the production of vials. Figure 1 shows a pharmaceutical vial where the parameters which are subject to inspection are marked.
Fig. 1A pharmaceutical vial with marked quality parameters

Table 1Quality defects in a descriptive system: * – primary identification; (*) – limited identification
Type of defect | No. of pcs. | Percentage of the total | Percentage of | Possibility of automatic inspection |
Scratches | 29 | 26,8 | 7,1 | * |
Sharp neck edges | 19 | 17,6 | 4,7 | * |
Total length | 17 | 15,7 | 4,2 | * |
Shape defect | 11 | 10,1 | 2,7 | (*) |
Outer flange diameter | 9 | 8,3 | 2,2 | * |
Vial outer diameter | 6 | 5,5 | 1,5 | * |
Inner flange diameter | 4 | 3,7 | 1,0 | * |
Glass defects – stones | 3 | 2,8 | 0,7 | * |
Bubbles | 3 | 2,8 | 0,7 | * |
Glass discoloration | 3 | 2,8 | 0,7 | * |
Total length | 2 | 1,8 | 0,5 | * |
Inclusions | 1 | 0,9 | 0,2 | (*) |
Sharp inner edges | 1 | 0,9 | 0,2 | - |
Distorted neck | - | - | - | * |
Circularity defect | - | - | - | * |
Sum: | 108 | 100 | 26,5 | (91,7%) |
Quality control with the use of a CCD camera, apart from the measurement of geometrical parameters, also makes it possible to control the defects in the surface clarity and purity of the molten glass (scratches, inclusions, bubbles, discolorations). In order to analyze the deviations from the prescribed quality parameters 400 vials were inspected and the types of quality defects were described. Table 1 illustrates the possible quality defects in a descriptive system [16, 17]. It follows from the analysis that the defects result from an inappropriate setting of parameters of the glass-forming machine. Since so many defects were found, as presented in Table 1, it was decided to use a CCD camera for an automatic inspection of the manufacturing process by an inspecting – sorting machine.
To this end, the following conceptual assumptions were made:
- to check as a whole all vials at the speed of 60 pcs/min,
- to connect the inspecting – sorting machine directly to the glass forming machine,
- to register quality data and production parameters,
- to store the data and to process quality parameters statistically.
3. The concept of product flow through an inspecting and measuring stand
It was observed (Table 1) that the number of possible defects in the production of vials is relatively high. To introduce an objective, fast and automatic product inspection and control, it was proposed to replace the statistical control methods used previously with an inspecting – sorting machine [18].
Fig. 2Flow of vials through inspecting stations of the inspecting – sorting automatic machine [18]
![Flow of vials through inspecting stations of the inspecting – sorting automatic machine [18]](https://static-01.extrica.com/articles/14454/14454-img2.jpg)
Such a large number of parameters subject to quality inspection requires the use of at least 4 CCD cameras, each of which will inspect only selected quality parameters. An assumption is also made that the overall inspection shall be solved by sampling inspection.
Figure 2 illustrates the principle of inspection and the flow of vials through the inspecting – sorting automatic machine taking into consideration the assumption of sampling inspection.
Table 2Stands descriptions
Stand I: | (camera 1. Figure a) | inspection of lateral sides of a vial, determination of total length ; |
Stand II: | (camera 2. Figure b) | identification of scratches in the flange area; |
Stand III: | (camera 3. Figure c) | inspection and measurement of the diameter , inspection of glass breaking and displacement of the axis of symmetry; |
Stand IV: | (camera 4. Figure d) | inspection of the base of the vial (bottom) which includes inspection of scratches and cracks. |
While constructing a laboratory model, a possibility of using additional cameras that would inspect more quality parameters was pointed out. However, it is connected with making the transportation and measuring cycle longer. Another difficulty consists in securing rotation of vials along their axis of symmetry at the inspection point.
4. Mathematical analysis of the inspecting – sorting machine
The basic objective of the analysis of transport of the vial to the inspecting point and during inspection is to present the design assumptions in the perspective of analysis of partial issues. Certain features are considered taking into account geometrical properties of elements cooperating in transport and measuring of vials (the vial radius , the radius of the guide roll , distance between rolls , feed of the descending roll ). Another problem consists in the determination of conditions for the stability of the system while taking measurements. Figure 3 is the starting point for the analysis. The figure illustrates a critical position when the vial goes from position I to position II at the inspection point. The shift I – II is achieved by moving the vial’s point of gravity while the feed roll is descending. Taking into consideration the geometrical dependencies following from Fig. 3, the following equation can be given [19]:
Fig. 3Flow of vials through inspecting stations of the inspecting – sorting automatic machine [18]
![Flow of vials through inspecting stations of the inspecting – sorting automatic machine [18]](https://static-01.extrica.com/articles/14454/14454-img3.jpg)
![Flow of vials through inspecting stations of the inspecting – sorting automatic machine [18]](https://static-01.extrica.com/articles/14454/14454-img4.jpg)
The above equation makes it possible to determine the geometrical values in the form:
Assuming the characteristic parameters of the system, e. g., , , , it is possible to determine the boundary value of feed at which the vial will change its position in the system.
Fig. 4Flow of vials through inspecting stations of the inspecting – sorting automatic machine [18]
![Flow of vials through inspecting stations of the inspecting – sorting automatic machine [18]](https://static-01.extrica.com/articles/14454/14454-img5.jpg)
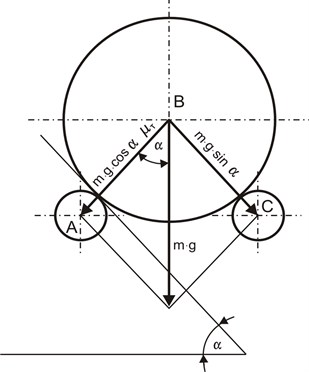
Fig. 5The system of forces acting on the vial

In further dynamic analyses, the moment of inertia of the vial was determined. A simplification was used in the calculations, i. e., the length of the vial was taken as , radius – , glass density – , boundary limits of integration , :
Considering the system of forces acting on the vial of radius between two rolls, an angle was introduced which describes the position of the roll with centre relative to the horizontal position . A change in the angle results in upsetting the stability of the vial and its displacement.
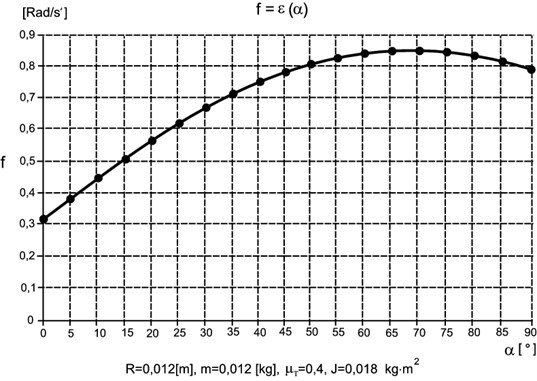
The angle represents the distance between the rolls. The value of angular acceleration dependent on is shown in Fig. 6.
All the values of which are above the boundary curve destabilize the system and displace the small-sized element (vial) at the quality inspection point:
Transport elements of the inspecting – sorting automatic machine can be constructed on the basis of the above geometrical analysis.
Fig. 6Chart f=ε(α)

5. Conclusions
The article presents selected aspects of securing quality control in the process of manufacturing pharmaceutical vials by using inspecting – sorting automatic machines.
The paper focuses on the mathematical analysis of “lift” transport which allows the cameras to inspect the whole area of the product.
The mathematical solution proves the correctness of the concept to introduce the type of transport discussed herein into the inspecting – sorting machine, the time of shift of circular-shaped products is reduced.
While considering globally the possibilities of applying the systems of inspection and control, it is worth pointing out that flexible control systems which secure quality control of a wide range of parameters (dimensions, surface qualities – inclusions, scratches, cracks, discoloration), which are indispensable in the case of medical products, are superior.
The results of theoretical and experimental research presented herein confirm the correctness of this approach.
The analysis of tasks of modern inspecting systems as exemplified by inspecting – sorting automatic machines shows how significantly technological solutions have changed and how they are adapted to the state of the art. In a certain sense, manufacturing systems without a feedback on the flow of information about the manufacturing process are no longer developed.
Control and inspecting – sorting systems employed for medical products can surely be further developed by using modern constructional elements, mechanical systems and transport systems whose role is to accelerate the time of shifting products to prescribed positions before, during and after inspection.
It seems appropriate and reasonable to integrate inspecting – sorting automatic machines with robotized means of transport of inspected products. Such integration will bring considerable savings in the manufacturing costs and allow a flexible use of power trucks for performing additional tasks.
References
-
Volmer J. Industrial Robots. VT VEB, Berlin, 1988, p. 106-117, (in German).
-
Dzidowski E., Cisek W. Place and role of engineering in manufacturing processes in the strategies of development. Science of the Institute of Technology of Machines and Automatisation of Wroclaw Polytechnics – 67, Series Conferences – 29, Automatization of Manufacturing in Engineering 97, Publishing House of Wroclaw Polytechnics, Vol. 2, 1997, (in Polish).
-
Hamrol A. Investigation of Special Processes. Publishing House of Poznan Polytechnics, Poznań, 1995, (in Polish).
-
Łasiński K. Transporting and positioning of small sized elements in the aspect of their control. PAN, Section of Machine Construction of the Committee of Machine Building, Seminar of the Section, Publishing House of Zielonogórsk Polytechnics, Zielona Góra, 2000, (in Polish).
-
Łasiński K. Methods of Quality Control Improvement for Small-Sized Products with the Use of Inspecting – Sorting Automatic Machines and Robotized Auxiliary Elements. Monograph, Publishing House of the University of Zielona Gora, Zielona Gora, 2009.
-
Łasiński K. Analysis of selected elements of structure of control automatics for packaging of pharmaceuticals. Science News, WSI, Vol. 102, Mechanika, Vol. 18, Zielona Góra, 1993, p. 83-90, (in Polish).
-
Sadowski A. Measurements in the Control of Dimensions – Rational Approaches. WNT Warszawa, 1965, (in Polish).
-
Miernik E., Krawczuk E. Mechanisation and Automatisation of Control. WNT, Warszawa, 1968, (in Polish).
-
Warnecke H., Bullinger H., Hichert R., Voegele A. Handbook for Engineers. WNT, Warszawa, 1993, (in Polish).
-
Piechowski M., Kalka R. Help of computer in the analysed system. Science Institute of Machine Technology and Automatisation of Wrocław Polytechnics – 67, Conference Series – 29, Automatisation of Manufacturing in Engineering 97, Publishing House of Wrocław Polytechnics, Vol. 2, 1997, (in Polish).
-
Łasiński K., Gawłowicz P., Papiór R., Galicki M., Brukszta A. Concept of quality control automatics II. 41 International Science Colloquium, Ilmenau Technical University, Germany, 1996, (in German).
-
Galicki M., Gawłowicz P., Łasiński K. Minimum – Energetic Motions for Redundant Manipulators in Work Space Including Obstacles. Archive of Machine Building, Vol. 4, PAN, Warszawa, 1996.
-
Galicki M., Gawłowicz P., Łasiński K. Generation of angles of redundant manipulator in basic construction. V Robotics Conference, Szklarska Poręba, 1996, (in Polish).
-
Łasiński K., Galicki M., Gawłowicz P. Optimal path planning for multipe vehicles. Eleventh CISM–IFTOMM Symposium on Theory and Practice of Robots and Manipulators, Springer-Verlag, Italy, 1996.
-
Dziuba R., Gruszka J., Hamrol A., Hubicki N., Jednoróg A., Koch T., Płaska S., Sierpina E., Strojny P., Zdrożny R., Zymonik Z., Zymonik J. Science of the Institute of Technology of Machines and Automatisation of Wroclaw Polytechnics – 67. Series Conferences – 29, Automatisation of Manufacturing in Engineering 97, Publishing House of Wroclaw Polytechnics, Vol. 1, 1997, (in Polish).
-
Łasiński K., Brukszta A., Gawłowicz P., Galicki M. Concept of quality control automatics. International Scientific Conference CIM 96 PAN, Śląska Polytechnics, Computer Integrated Manufacturing, Zakopane, 1996, (in Polish).
-
Mokrzycki W. Encyclopedia of Image Recognition. Academical Publishing House, RM, Warszawa, 1992, (in Polish).
-
Łasiński K., Bock B., Frielinghaus K. Mechanical principles for quality control automatics and their geometry. International Science Colloquium on Glass-Ceramics, Ilmenau Technical University, 1989, p. 34-37, (in German).
-
Łasiński K., Gawłowicz P. Mathematical analysis of transportation. Manufacturing Management, Vol. 2, Technical University Press, Zielona Góra, 1995, p. 26-30, (in Polish).
