Abstract
The objective of the present work is to investigate the induced stress and deformation of a crank shaft. For this purpose, Variable Compression Ratio (VCR) engine is tested at 16.5 compression ratio. Peak pressures were recorded at various crank angles. A Matlab code is generated for dynamic analysis. For structural analysis and factor of safety, a three dimensional model crank shaft was developed using solid works. Finite element analysis of AISI E4340 Forged steel and Aluminum alloy 7076-T6 materials are carried by using analysis software ANSYS. The obtained results are equivalent Von-Mises stress, total deformation and factor of safety at different crank angles for the two materials are analyzed. It is concluded that Aluminum alloy exhibits better results than forged steel.
1. Introduction
The work output of the diesel engine depends on the torque conversion in combustion chamber. Better torque conversion is possible only when the heat energy pushes the piston axially downward direction. For better torque conversion, crank shaft plays a vital role. Since diesel engine combustion is heterogeneous process [1] the crank shaft is subjected to several progressive cyclic bending and torsion loads induced by the pressure waves generated from the combustion phenomena [2, 3]. In order to reduce the failure, the crankshafts are case hardening and nitriding [4, 5]. Several studies prove that, nitriding proves to be the best and the most effective method to increase fatigue resistance [6]. To increase the hardness and wear resistance, some surface treatment methods are also used without modifying the mechanical properties, but these methods have also failed in recent demonstration [7, 8]. Literature on crankshaft failure and stress analysis reveals that, K Satyanarayana et.al [9, 10] investigated the stress induced in the crank shaft AISI E4340 forged steel and determined the pin forces and bearing reactions with respective crank angles. Silva [11] from experimental investigation on journal bearings, there are three main root causes of failure of journal bearings, namely, operating, mechanical and repairing. Zoroufi and Fatemi [12] in their review article the effect of influential parameters like residual stress on fatigue behaviour and the methods of inducing compressive residual stress in crankshafts. In paper [13-17] an attempt was made to analyze the crank shaft with two alloys and their effect on the mechanical behaviour.
2. Methodology
Experimentation was carried out on a four stroke single cylinder variable compression ratio (VCR) diesel engine; the technical specifications are shown in the Table 1. The engine is loaded with eddy current dynamometer as shown in the Fig. 1 and the engine is tested under different loads i.e. no load to full load (3.7 kW) with a compression ratio 16.5. Cylinder pressures and volume are measured at every crank angle. The maximum gas pressures at different crank angles were taken from the experimental data for simulation and analysis of Von Mises stress and deformation of the crank shaft [18-22]. The materials used for analysis are shown in the Table 2.
Table 1Technical specifications of the engine
S. No. | Features | Specifications |
1 | Make | Kirloskar engine |
2 | Type | 4 Stroke single cylinder water cooled |
3 | Speed | 1500 rpm |
4 | Crank radius | 55 mm |
5 | Connecting rod length | 300 mm |
6 | Cylinder diameter | 80 mm |
7 | Compression ratio | Variable |
8 | Stroke length | 110 |
Table 2Material properties
S. No. | Property | Material | |
Forged steel (AISIE4340) | Aluminum alloy (7076-T6) | ||
1 | Density | 7850 kg/m3 | 2840 kg/m3 |
2 | Poisson’s ratio | 0.29 | 0.33 |
3 | Young’s modulus | 205 GPa | 67 GPa |
4 | Yield strength | 470 MPa | 470 MPa |
5 | Ultimate strength | 745 MPa | 510 MPa |
2.1. Variable compression ratio diesel engine
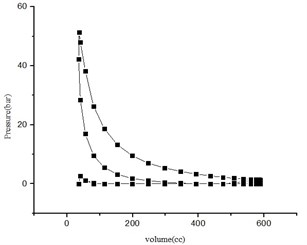
The setup consists of single cylinder, four stroke Variable compression ratio diesel engine connected to eddy current dynamometer for loading the compression ratio change without stopping the engine and without alerting the combustion chamber geometry by specially designed tilting cylinder block arrangement. Setup is provided with necessary instruments for combusting pressure and crank-angle measurement. These signals interfaced to computer through engine indicator for p-v diagrams are shown in Fig. 2. The set up enables to study the for VCR engine performance for brake power, indicated power, frictional power, BMEP, IMEP, brake thermal efficiency, indicated thermal efficiency, mechanical efficiency, volumetric efficiency, specific fuel consumption and heat balance.
Fig. 1Experimental setup of computerized variable compression ratio (VCR) diesel engine
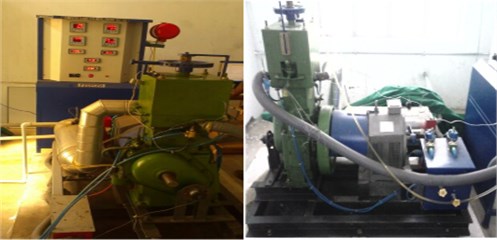
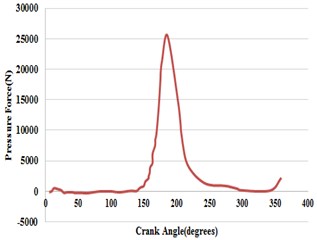
Fig. 2a) PV-diagram and, b) variation of pressure force with crank angle and volume at variation of pressure (Pθ-diagram)
a)
b)
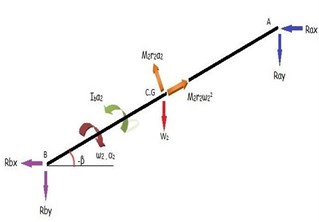
PV-diagram is plotted for Experimental Results of Test Conducted VCR Diesel Engine at Compression Ratio 16.5. The dynamic analysis is carried out by developing the equations of equilibrium from the Free Body Diagrams (Figs. 4-6) of individual components of Slider-Crank Mechanism (Fig. 3). The forces induced at the pin joints and inertia forces obtained from the dynamic analysis were used as input for further analysis. Further, the critical angles, at which the inertia forces or pin forces, are maximum or minimum, are also determined from the dynamic analysis [23]. A three dimensional model of diesel engine crankshaft is developed by using SOLID WORKS software (Figs. 7 and 8). And further analysis is carried out by using ANSYS WORKBENCH 15.0 software.
2.2. Kinematic analysis
Kinematic Analysis involves determination of linear displacement, linear velocity, linear acceleration of piston, angular displacement, angular velocity and angular acceleration of connecting rod. It is assumed that the crankshaft rotates at a constant angular velocity.
Fig. 3Slider-crank mechanism
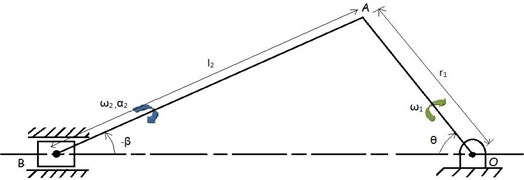
Kinematics of piston:
– Displacement of piston:
– Velocity of piston:
– Acceleration:
Kinematics of connecting rod:
– Angular velocity of connecting rod (w2).
– Acceleration of piston (α2).
Kinematics of crank:
– Angular velocity of crank ¨ω1=2πN/60.
2.3. Dynamic analysis
Taking the Kinematic parameters and pressure force acting on piston into consideration the Dynamic analysis of total mechanism is carried out. The first step in this direction is to draw the free body diagram of each of the members and identify all the forces which include the reactive forces of the constraints, inertia forces, weight of members and external forces acting on them.
The equations of equilibrium for piston are:
The equations of equilibrium for crank are:
Similarly, the equations of equilibrium for connecting rod are:
Considering moments about B and rearranging the terms, we get:
The above seven Eqs. (1) to (7) are solved simultaneously in the obtaining the forces Rax, Ray, Rbx, Rby and N.
Fig. 4Free body diagram of piston
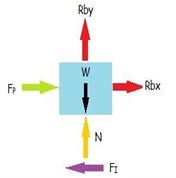
Fig. 5Free body diagram of crank
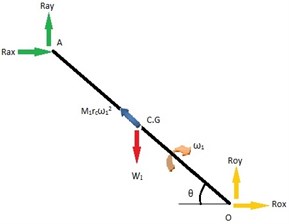
Fig. 6Free body diagram of connecting rod
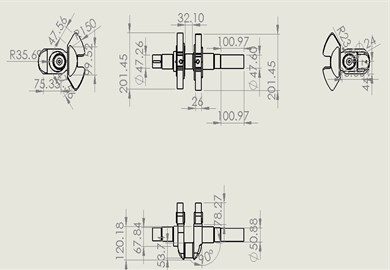
2.4. Geometric modeling of crank shaft using solid works
Fig. 7Crank shaft 3D model
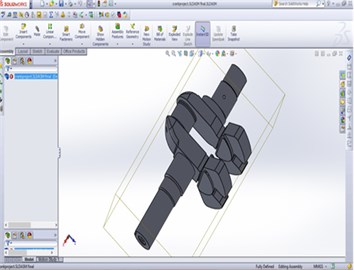
Fig. 8Actual crankshaft in solid works
2.5. Finite element analysis
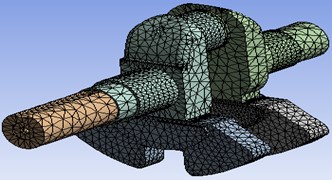
Finite element method is a numerical analysis technique for obtaining the approximate solutions to a wide variety of engineering problems. Although it was originally developed to study stresses in complex airframe structures, it has been extended and applied to the broad field of continuum mechanics. Because of its diversity and flexibility as an analysis tool, it is receiving much attention in engineering schools and industry. The finite element method has become a powerful tool for the numerical solution of a wide range of engineering problems. Advances in computer technology and CAD systems, has led to increased use of FEM in research as well as industry, as complex problems can be modeled and released with relative ease. To carry out kinematic and dynamic analysis of a crank shaft using output of a test conducted on computerized V. C. R Kirloskar diesel engine equipment with pressure transducer. Normally the stress analysis has to be carried out at all analysis of rotation. However, this is time consuming and requires lots of computational time, so the analysis is limited to specific position of crank angles, and such analysis is termed as quasi-dynamic analysis. The ANSYS Workbench platform automatically forms a connection to share the geometry for both the fluid and structural analysis, minimizing data storage and making it easy to study the effects of geometry changes on both analysis. In addition, a connection is formed to automatically transfer pressure loads from the fluid analysis to the structural analysis. The element used for analysis is 3-D Node Tetrahedral Solid. The model is fine meshed, and the number of elements is 2,99,533 and the number of nodes is 4,48,642. The results are presented for both structural stress analysis and fatigue analysis at all critical angles of rotation. This analysis is carried out for both materials [24]. In dynamic analysis the equations of equilibrium are written for each of the links individually. The equations of equilibrium are further solved to obtain the forces at the joints. While writing the equations of equilibrium, the inertia force on the piston, connecting rod and crankshaft are also considered.
Fig. 9Finite element meshing of crankshaft
3. Results and discussion
3.1. Results of dynamic analysis
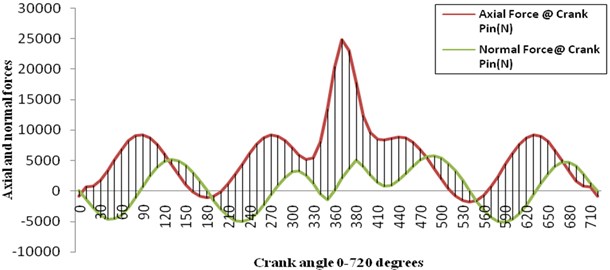
Taking the kinematic parameters and pressure force acting on piston into consideration, the dynamic analysis of crank shaft is carried out. The free body diagram of the crank shaft is shown in Fig. 5. Further a Matlab program is developed from the equations of equilibrium to identify the crank angles where maximum axial and normal forces occur at crank pin and bearings supports. The results obtained from the program is plotted in the Figs. 10 and 11 and are reported in the Table 3. It was found that the maximum values are obtained at crank angles of 365°, 490°, 540° and 590°. Thus, the structural analysis of the crank shaft is restricted to these crank positions only. For structural analysis of the crank shaft the Solid model is converted into a FEA model and the results are obtained after applying the structural boundary conditions [25-29].
Table 3Maximum axial and normal forces at crank pin and bearings supports
Crank angles | Axial force at bearing supports (n) | Normal force at bearing supports (n) | Axial force at crank pin (n) | Normal force at crank pin (n) |
365 | –20957 | –1879.5 | 24871 | 2011.4 |
490 | 172.9580962 | –5796.479455 | 3651.618314 | 5711.003166 |
540 | 5704.081067 | –106.810845 | –1777.844803 | –25.62320209 |
590 | –318.0471309 | 5090.474419 | 4345.584061 | –5175.18078 |
Fig. 10Variations of axial and normal forces at bearings vs crank angle
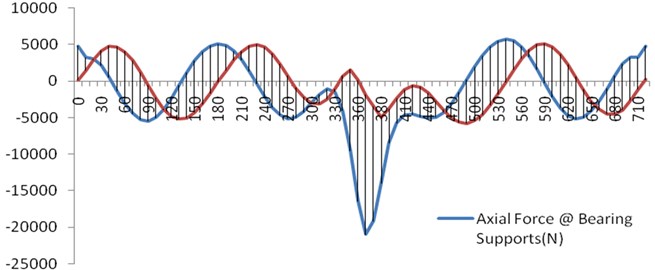
Fig. 11Variations of axial and normal forces at crank pin vs crank angle
3.2. Structural stress analysis
The stress analysis is carried for AISI E4340 Forged steel and Aluminum alloy 7076-T6 materials at critical angles of 365, 490, 540 and 590 by considering the (Rax, Ray) & (Rox, Roy) forces applied at crank pin and bearings supports as shown in Figs. 4, 5 and 6. The Structural results of Equivalent stresses and deformations obtained from ANSYS are shown in Table 4.
Fig. 12Crank angle 365 maximum values of equivalent von-misses stresses and total deformation
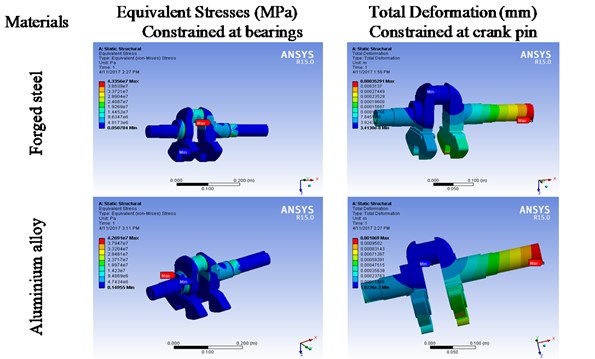
Table 4Maximum values of equivalent von-mises stresses and total deformation
Materials at crank angle | Equivalent stresses (MPa) | Total deformation (mm) | ||
Constrained at bearings | Constrained at crank pin | Constrained at bearings | Constrained at crank pin | |
Forged steel at 365 | 43.351 | 170.612 | 0.0160 | 0.351 |
Aluminum alloy at 365 | 42.692 | 166.733 | 0.0491 | 1.068 |
Forged steel at 490 | 38.021 | 52.303 | 0.007 | 0.084 |
Aluminum alloy at 490 | 37.152 | 51.532 | 0.021 | 0.256 |
Forged steel at 540 | 3.121 | 5.991 | 0.001 | 0.012 |
Aluminum alloy at 540 | 3.042 | 5.861 | 0.003 | 0.038 |
Forged steel at 590 | 34.532 | 52.712 | 0.006 | 0.086 |
Aluminum alloy at 590 | 34.621 | 51.832 | 0.021 | 0.262 |
From the Table 4, it can be observed that stresses and total deformation are more at crank pin than at bearing supports. Minimum stresses are obtained at crank angle 540° and maximum stresses are obtained at crank angle 365°, as shown in Fig. 12. The order of stresses is same for both materials at all critical angles of rotation but the deformation is almost three times higher in Aluminum alloy when compared to forged steel.
3.3. Fatigue analysis
During the service life of a crank shaft, they are subjected to several cyclic bending and torsion loads induced by the pressure generated from the combustion process and the inertia of the components in relative motion. The magnitude of the force depends on many factors which consists of crank radius, connecting rod dimensions, weight of the connecting rod, piston, piston rings, and pin. Combustion and inertia forces acting on the crank shaft causes two types of loadings on the crank shaft structure: torsional load and bending load. Mechanical failures of the crankshafts are caused by fatigue phenomena. For improvement of the fatigue resistance they are mainly ascribed to both the residual stress field and the surface hardening. Design developments have always been an important issue in the crankshaft production industry. In order to manufacture a less expensive component with the minimum weight possible, proper fatigue strength and other functional requirements, these improvements result in lighter and smaller engines with better fuel efficiency and higher power output.
Hence in the present work, fatigue analysis is also carried at all critical angles for both materials and the results of Factor of safety is shown in Table 5. This analysis consists of determining the factor of safety for a minimum assumed number of cycles of 106. As the maximum factor of safety is to be considered, it can be concluded from the Table 5 that a factor of safety of 15.1 has to be taken for both materials.
Table 5Factor of Safety values at different crank angles
Materials | Crank angle 365° | Crank angle 490° | Crank angle 540° | Crank angle 590° |
Forged steel | 3.8078 | 12.416 | 15.1 | 12.332 |
Aluminum alloy | 5.1532 | 4.2656 | 15.1 | 4.2437 |
4. Conclusions
The Quasi dynamic stress analysis of the crank shaft for two different materials namely Forged steel (AISI E4340) and Aluminum alloy (7076-T6) was carried out at a compression ratio of 16.5. From the experimental observations and finite element analysis the following conclusions are made.
1) MATLAB program is developed from the equations of equilibrium to identify the crank angles where maximum axial and normal forces occur at crank pin and bearings supports. It was found that the maximum values are obtained at crank angles of 365°, 490°, 540° and 590°.
2) For the above crank angles, structural analysis was done using ANSYS and the results shows that the stresses and total deformation are more at crank pin than at bearing supports. Minimum stresses are obtained at a crank angle of 540° and maximum stresses are obtained at a crank angle of 365°. The order of stresses are same for both materials at all critical angles of rotation, but the deformation is almost three times higher in Aluminum alloy when compared to the forged steel. Thus, Aluminum alloy (7076-T6) exhibits better results in comparison with AISI E4340 Forged steel.
3) Fatigue analysis was also carried at all critical angles for both materials and the results shows that the minimum factor of safety of both the materials is found to be 4.24 for Aluminum alloy and 3.8097 for Forged steel. The maximum factor of safety is found to be 15.1 for both materials.
References
-
Aditya Kolakoti, Appa Rao B. V. Effect of fatty acid composition on the performance and emission characteristics of an IDI supercharged engine using neat palm biodiesel and coconut biodiesel as an additive. Biofuels, 2017, https://doi.org/10.1080/17597269.2017.1332293.
-
Garro A., Vullo V. Some consideration on the evaluation of thermal stresses in combustion engine. SAE Paper No. 780664, 1978, p. 2563-2592.
-
Bargis E., Garro A., Vullo V. Crankshaft design and evaluation. Part 1: critical analysis and experimental evaluation of current methods. Part 2: a modern design method: modal analysis. Part 3: modern design method: direct integration. The International Conference on Reliability, Stress Analysis and Failure Prevention in Mechanical Design, 1980.
-
Chien W. Y., Pan J., Close D., Ho S. Fatigue analysis of crank- shaft sections under bending with consideration of residual stresses. International Journal of Fatigue, Vol. 27, 2005, p. 1-19.
-
Ho S., Lee Kang Y. L. H. T., Wang C. J. Optimization of a crankshaft rolling process for durability. International Journal of Fatigue, Vol. 31, 2009, p. 799-808.
-
Konečná R., Nicoletto G., Majerová V. Influence of nitriding on the fatigue behavior and fracture micro mechanisms of nodular cast iron. Strength of Materials, Vol. 23, 2008, p. 75-78.
-
Jung U., Schaal Berger R., Reinig C. H. W., Traiser H. Predicting the fatigue strength of fillet-rolled crankshafts. Materialwissenschaft und Werkstofftechnik, Vol 29, 1998, p569–572.
-
Sirin S. Y., Sirin K., Kaluc E. Effect of the ion nitriding surface hardening process on fatigue behaviour of AISI 4340 steel. Materials Characterization, Vol. 59, 2008, p. 351-358.
-
Satyanarayana K., Viswanath A. K., Raot H., Rao S. V. U. M. Investigation of the stresses induced in crank shaft AISI E4340 forged steel. Procedia Engineering, Vol. 173, 2017, p. 1672-1677.
-
Satyanarayana Katakam, Satishkumar G., Rao Srinivasa M. S. S., Rao Hanumanta T. V., Rao Umamaheswara S. V. Kinematic and dynamic analysis of connecting rod for variable compression ratio diesel engine. International Journal of Current Engineering and Scientific Research, Vol. 3, Issue 4, 2016, p. 36-42.
-
Zoroufi M., Fatemi A. Fatigue Performance Evaluation of Forged versus Competing Process Technologies: A Comparative Study of Forged Steel versus Austempered Ductile Iron Crankshafts. Forging Industry Educational and Research Foundation and American Iron and Steel Institute (AISI), Toledo, OH, USA, 2005.
-
Silva F. S. An investigation into the mechanism of a crankshaft failure. Key Engineering Materials, Vols. 245-246, 2003, p. 351-358.
-
Jensen E. Crankshaft Strength through Laboratory Testing. Society of Automotive Engineers. Warren dale, PA, USA, Technical Paper No. 700526, 1970.
-
Mourelatos Z. An Analytical Investigation of the Crankshaft-Flywheel Bending Vibrations for a V6 Engine. Society of Automotive Engineers, Technical Paper No. 951276, 1995.
-
Uchida S., Hara K. The Development of the DCI Crankshaft for the Nissan 60°-V6 Engine. Society of Automotive Engineers, Warren dale, PA, USA, Technical Paper No. 841220, 1984.
-
Payer E., Kainz A., Fiedler G. Fatigue Analysis of Crankshafts Using Nonlinear Transient Simulation Techniques. Society of Automotive Engineers, Warrendale, PA, USA, Technical Paper No. 950709, 1995.
-
Borges A. C., Oliveira L. C., Neto P. S. Stress Distribution in a Crankshaft Crank Using a Geometrically Restricted Finite Element Model. Society of Automotive Engineers, Warren dale, PA, USA, Technical Paper No. 2002-01-2183, 2002.
-
Mohana Rao P. V. J. Free convective heat transfer from a vertical surface for the case of linearly varying thermal potential. American Journal of Engineering Research, Vol. 2, Issue 9, 2013, p. 71-75.
-
Satyanarayana K., Vinodh Kumar Padala, Rao Hanumantha T. V., Umamaheswararao S. V. Variable compression ratio diesel engine performance analysis. International Journal of Engineering Trends and Technology, Vol. 28, 2015, p. 6-12.
-
Satyanarayana K., Naik Rt, Uma Maheswara Rao S.-V. Performance and emissions characteristics of variable compression ignition engine. Advances in Automobile Engineering, 2016, https://doi.org/10.4172/2167-7670.1000146.
-
Aditya Kolakoti, Appa Rao B. V. A comprehensive review of biodiesel application in IDI engines with property improving additives. I-Managers Journal of Mechanical Engineering, Vol. 5, Issue 4, 2015, p. 35-45.
-
Victor Talamala, Prasada Rao Kancherla, Appa Rao Basava V., Aditya Kolakoti Experimental investigation on combustion, emissions, performance and cylinder vibration analysis of an IDI engine with RBME along with isopropanol as an additive. Biofuels, Vol. 8, Issue 3, 2017, p. 307-321.
-
Satyanarayana K., Umamaheswararao S. V., Viswanath A. K., Rao Hanumanta T. V. Quasi-dynamic and thermal analysis of a diesel engine piston under variable compression. Materials Today: Proceedings, 2017.
-
Uma Maheswara Rao S. V., Rao Hanumanta T. V., Satyanarayana K., Nagaraju B. Fatigue analysis of sundry I.C engine connecting rods. Materials Today: Proceedings, 2017.
-
Kumar Niranjan I. N., Rao Chandraprasad S., Appa Rao B. V. Heat Release Rate Analysis of a DI Diesel Engine Using Diesel and Seawater Semi-Stable Emulsion. Society of Automotive Engineers, Warren dale, PA, USA, Technical Paper No. 2002-01-2719, 2002.
-
Sukhvinder Kaur Bhatti, Devi Shyamala P. V. N. L., Neelapu M. L., Kedarnath C., Niranjan Kumar I. N. Transient state stress analysis on an axial flow gas turbine blades and disk using finite element procedure. Proceedings of the 4th WSEAS International Conference on Heat Transfer, Thermal Engineering and Environment, Elounda, Greece, 2006, p. 323-330.
-
Kumar Niranjan I. N., Chandraprasad S., Apparao B. V. Comparative performance study of jatropha methyl ester as diesel fuel substitute on DI diesel engine with emphasis on vibration and noise as potential engine parameters. ASME International Mechanical Engineering Congress and Exposition Orlando, FL, USA, 2005.
-
Rao Naga Bhushana V., Kumar Niranjan I. N., Madhulata N., Abhijeet A. Mechanical analysis of 1st stage marine gas turbine blade. International Journal of Advanced Science and Technology, Vol. 68, 2014, p. 57-64.
-
Naresh G., Raja K., Mukherji B. P. V. S. K., Kumar Niranjan I. N., Rao Naga Bhushana V. An investigation and comparative analysis on marine gas turbine rotor blade with cooling holes using FEA. International Journal Aerodynamics, Vol. 5, Issues 3-4, 2016, p. 202-216.
-
Satish G., Prasad V. V. S., Koona Ramji Manufacturing and characterization of CNT based Polymer composites. Mathematical Models in Engineering, Vol. 3, Issue 2, 2017, p. 89‑97.
About this article
We express our sincere thanks to Anil Neerukonda Institute of Technology and sciences, Visakhapatnam, Andhra Pradesh, India, for providing experimental test rig, Computerized VCR diesel engine. First Author expresses gratitude to research guides Prof. S. V. U. M. Rao, Marine Department, Andhra University and Prof. T. V. Hanumantha Rao.

