Abstract
The parametric model proposition of modelling vibrations signal of the vehicle drive system is presented in the paper. The reference model is established for the new drive system to which the control measurements, performed at definite time intervals of automobile running, are compared. This base model must be actualized after each drive system overhaul and as the casual wear progresses. The recursive identification method of the model is performed. The method allows the on-board diagnostics of a gearbox, main gearbox, differential gear and triple joints. The diagnostic method was verified on the example of the vibrations signal recorded for the drive system of the Fiat Punto automobile.
1. Introduction
The model-based approach to diagnostics problem is proposed in the paper [1]. During the modelling process of the drive system the problem of selecting the complexity degree of the model occurs. Of course, it would be possible to design one global model of the vehicle drive system [2] and to expand it, but in such case the complication degree will not allow to use it for the on-board diagnostics. Instead of the structural model, which is too complicated, the statistic model of the vibroacoustic signal propagation – on a very high abstraction level – is proposed in the presented hereby study. The necessary condition of the proper model operation is then its accurate formal identification [3]. This model is created in the adaptive way, which means firstly: the accelerated model identification and secondly: adjusting the model to the given type of the drive system and its working time [4]. Designing of such a model requires performing a series of measurements in the selected points of the drive system as well as other additional synchronizing signals during normal vehicle maintenance, it means during driving at a steady speed and without abrupt load changes. The base model takes into account the influence of responses of all elements of the drive system. The proposed method of modelling can be used for the on-board diagnostics of the mechanical defects of the vehicle drive line.
2. Vibration signal measurement
Signals of approximately 1 second duration are recorded while driving at constant rotational speed, without abrupt changes of an engine load. Small fluctuations of rotational speeds are eliminated during further analysis by means of time synchronization and interpolation operations. Maintaining a constant rotational speed of the engine is essential, since this parameter strongly influences the vibration amplitude.
The following signals are needed to perform the described method:
– accelerations of the gearbox housing vibrations;
– voltage from the sensor of the crankshaft position (for a speed estimation);
– voltage from the sensor of the throttle position (for a load estimation).
Accelerations of vibration signals of the drive system, due to the narrower frequency range of the investigated signal, were processed by means of the Bruel & Kjaer sensors of type IEPE No. 4514. Signals were recorded by means of the portable recording device Bruel & Kjaer PULSE type 3560E with the sampling frequency of 65536 Hz. The crankshaft position signal and the coil signal allowed the identification of engine work cycles, ignition moments and timing gear phases.
Signals of vibration accelerations of the vehicle drive system are periodical, and for the constant rotational speed also stationary and ergodic with elements of a random noise. The spectrum of the vibration signal generated by the gearbox is presented in Fig. 1. Its main components are trains of harmonics of the crank shaft rotational speed [5-7]. This is the broad-band spectrum and the generation of so many harmonics is related, among others, to the unbalancing and misalignments of shafts – changing during the drive – as well as to transferring of vibrations caused by the cyclic operations of engine valves. The successive harmonics corresponding to operations of next cylinders are visible in the band of lower frequencies (for the 4-cylinder engine this is the half of the crank shaft frequency). The next excitation source constitutes the tooth-passing of the gearbox and the main gearbox and also their harmonics. In the range of low frequencies (up to the crank shaft rotational frequency ) the component of the half-shaft and the components related to operations of individual cylinders are seen.
Fig. 1Average spectrum of gearbox vibrations acceleration (vibration amplitude vs harmonic number of the crankshaft frequency) [4]: a) entire measurement range, b) low frequency range
![Average spectrum of gearbox vibrations acceleration (vibration amplitude vs harmonic number of the crankshaft frequency) [4]: a) entire measurement range, b) low frequency range](https://static-01.extrica.com/articles/14460/14460-img1.jpg)
a)
![Average spectrum of gearbox vibrations acceleration (vibration amplitude vs harmonic number of the crankshaft frequency) [4]: a) entire measurement range, b) low frequency range](https://static-01.extrica.com/articles/14460/14460-img2.jpg)
b)
3. The reference model and its identification
During the life time of the drive system its vibration characteristics are changing, spectrum becomes smeared, new components are added, etc. To be the universal model it has to be able to adapt itself for various drive systems being in various states of wear. First of all, the reference model remembered for the new system must exist. Such model should automatically update itself after each repair or each change of parts. Finally, it must be determined for the selected engine rotational speeds since the vibration characteristics are strongly dependent on this parameter.
Consider the autoregressive (AR) signal model represented in the transfer function form:
where the polynomial , is the backward shift operator, – measurement, – zero mean white noise and , 1, 2, ..., are the unknown constant parameters for each sampling moment .
The above AR model can be written in the form of linear regression relationship [8]:
where:
and:
Then the deterministic recursive least squares (RLS) estimation algorithm takes the following form:
with the:
representing the recursive residual or one-step-ahead prediction error for each sampling moment , calculated on the basis of the actual measurements and the estimate .
The Auto Regressive (AR) model is characterized by a lack of the input signal. In this case, the vibration response is treated as the result of the influence of a certain non-measurable disturbance .
Before the identification the signal must be properly prepared by:
– removal of constant components and trends,
– filtration in order to select the characteristic frequency range,
– determination of the autocorrelation function or synchronous averaging,
– signal decimation.
Thus let us perform the parametric identification for the time-waveform of the gearbox vibration signal in the low-frequency range, of the drive system in good technical condition. This signal should be prepared by filtering out high frequencies (higher than three times the crankshaft frequency). Then the autocorrelation function must be determined. 10-times decimation was also applied since the signal was over-sampled and the model identification would require too many rather useless coefficients. Recursive identification of the model parameters was performed.
On the basis of the model assessment indices, it can be assumed that the auto-regression model of the 4th order is satisfactory. The comparison of the recorded vibration signal with the AR model output of 4 coefficients is presented in Fig. 2.
Fig. 2Reference model of the gearbox low-frequency vibration signal: a) comparison of the waveform of the signal autocorrelation function and AR model, b) coefficients a of the AR model adapting during the recursive model identification

a)

b)
The model quality assessment is done on the basis of the following indices: Akaike’s Information Criterion (AIC), Final Prediction Error (FPE), Fit [4, 9].
4. Case study of the gearbox wear diagnostics
Generating the reference spectrum and its comparison with the signal spectrum is the easiest method, however less suitable at on-board diagnostics of vehicle drive system defects [10]. If, in addition, we do not have the recorded waveforms long enough to obtain the sufficient resolution of the spectrum, the time waveforms seem more suitable.
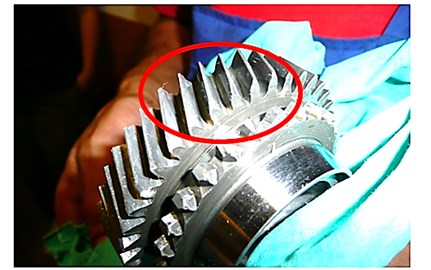
Another reason of using the time waveform is a signal modulation, as in the case of uneven wear of gearbox teeth (Fig. 3).
Fig. 3Worn teeth of the gearbox
The waveform of the vibrations acceleration signal for such a case is presented in Fig. 4. That time, the averaged vibrations spectrum is not as useful as the time waveform.
On the grounds of the filtered and synchronously averaged waveforms the basic measures of the vibration signal are determined. The selected measures of the signal determined for the gearbox in good technical condition and for the gearbox with worn teeth are listed in Table 1.
The list of measures can be useful for the subsequent confirmation of the diagnosis, but the main procedure is based on the diagnostic model.
Fig. 4Synchronously averaged waveforms of the gearbox vibration at a speed of 3000 rpm for: the gearbox in good condition, the gearbox with casual wear of the teeth and the gearbox just before a failure
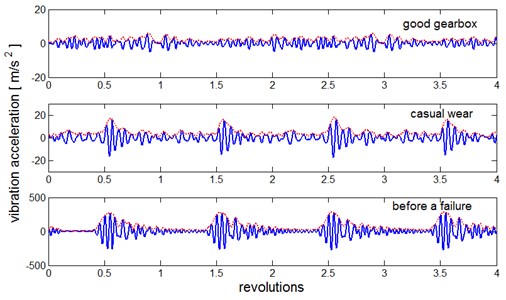
Table 1Signal measures of the teeth wear of the gearbox at 3000 rpm
Vibration signal measure | Gearbox in good technical condition | Casual wear | Before a failure |
Peak-to-peak value [m/s2] | 10.3008 | 33.6274 | 546.0568 |
RMS value [m/s2] | 1.8343 | 4.2969 | 78.7564 |
Average value [m/s2] | 1.4510 | 3.1217 | 51.3733 |
Peak-to-peak value of the envelope [m/s2] | 5.8500 | 17.9173 | 284.4201 |
The diagnostic system records, every determined amount of kilometres, the gearbox vibrations acceleration signal together with auxiliary signals mentioned above. Then it is subjected to further analysis, that is to filtration, decimation and determination of the autocorrelation function (as at the reference model determination). Such signal preparation eliminates random errors and alarms. This requires using the determined amount of the system memory and time, thus the procedure is not exactly on-line. The transformed signal of the vibrations acceleration of the worn pair of wheels of the th gear was compared in Fig. 5 with the reference model, for the characteristic frequency band.
Fig. 5Comparison of the autocorrelation function of the signal for the reference model, the gearbox with casual wear of the teeth and the gearbox just before a failure
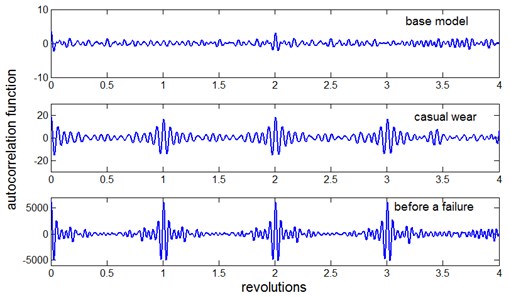
Using of the autocorrelation function guarantees removal of the uncorrelated noise and allows building of simpler model with small amount of coefficients. The not normalized autocorrelation function makes possible a direct comparison of the signals in Fig. 5 and can be used for the assessment of the level of wear. If the normalized autocorrelation function is used, only classification ‘good – bad’ is possible.
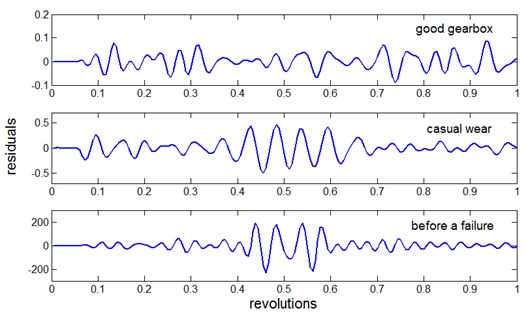
On the grounds of the adaptive reference model for the system in good technical condition the residual signals for the gearbox in good condition and for the worn one were determined (Fig. 6).
Fig. 6Residual signals for three levels of wear of the teeth of gearbox
The selected measures of the residual signals determined for the gearbox in good technical condition and for the worn out gearbox are listed in Table 2.
Table 2Residual measures for three levels of the teeth wear of the gearbox
Residual measure | Gearbox in good condition | Casual wear | Before a failure |
Peak-to-peak value [m/s2] | 0.1780 | 0.9549 | 423.2935 |
RMS value [m/s2] | 0.0331 | 0.1657 | 58.4411 |
Average value [m/s2] | 0.0257 | 0.1194 | 36.0910 |
Uncertainty of the model | 1.9086·10-4 | ||
The uncertainty of the model was calculated according to the following formula:
where – standard deviation; – signal for gearbox with no defects (properly pre-processed); – model output; – residual signal for gearbox with no defects; – number of samples.
For confirmation of the diagnosis further signal analysis like spectrum of the signals and residuals should be checked.
5. Case study of the ‘low-frequency’ defects diagnostics
The methodology of proceedings can be presented for the worn differential gear (Fig. 7) or for the worn triple joint (Fig. 8).
The parametric identification for the time-waveform of the gearbox vibration signal in the low-frequency range, of the drive system in good technical condition was shown in Fig. 2a. In this case the signal should be prepared by filtering out high frequencies (higher than three times the crankshaft frequency) and by synchronous averaging instead of the autocorrelation function. Such solution needs more complicated model (more coefficients of the model).
The comparison of the averaged signals of the base model low frequency vibration signal of the gearbox, with the signals recorded for the worn differential gear and for the worn triple joint, is presented in Fig. 9.
On the grounds of the filtered and synchronously averaged waveforms the basic measures of the vibration signal are determined. The selected measures of the signal determined for the reference model, for the worn differential gear and for the worn triple joint are listed in Table 3.
Fig. 7Casual wear of the differential gear
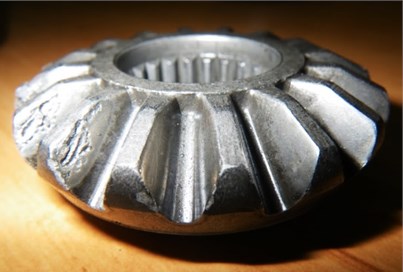
Fig. 8Wear of the triple joint
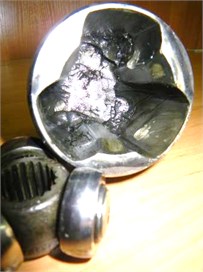
Fig. 9Filtered and synchronously averaged waveforms for the reference model, worn differential gear and worn triple joint
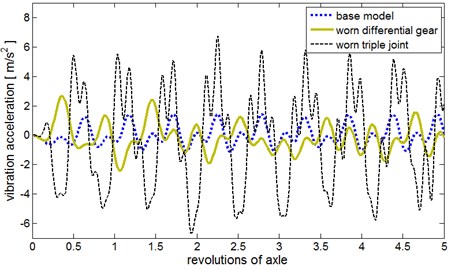
Table 3Signal measures for the good system, for the worn differential gear and for the worn triple joint
Signal measure | No defects (reference model) | Worn triple joint | Worn differential gear |
Peak-to-peak value [m/s2] | 2.5760 | 13.4061 | 5.0762 |
RMS value [m/s2] | 0.6843 | 3.3428 | 0.9652 |
Average value [m/s2] | 0.5502 | 2.8630 | 0.7591 |
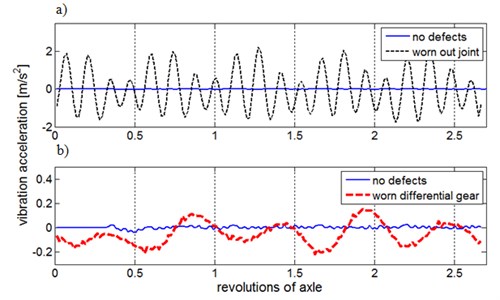
The comparison of the residual signals of the base model and low frequency vibration signal of the gearbox, with the signals recorded for the defected differential gear and triple joint, is presented in Fig. 10.
The selected measures of the residual signals determined for the not defected drive system, for the worn out triple joint and for the worn out differential gear are listed in Table 4.
Table 4Residual measures of the good drive system and selected defects at 3000 rpm
Residual measure | Not defected system | Worn triple joint | Worn differential gear |
Peak-to-peak value [m/s2] | 0.1867 | 4.0768 | 0.5918 |
RMS value [m/s2] | 0.0359 | 1.3855 | 0.1661 |
Average value [m/s2] | 0.0391 | 1.6134 | 0.1896 |
Uncertainty of the model | 0.0118 | ||
Fig. 10Residual signals compared for: a) not defected system and worn out triple joint, b) not defected system and worn out differential gear
6. Conclusions
1. It is shown that the following signals are needed for the detection of mechanical defects of the vehicle driving system: from one vibrations sensor attached to the gearbox housing, from the crankshaft position sensor (for the synchronization of vibration signals) and from the throttle position sensor (for the assessment of the mechanical load of the engine).
2. The vibration signal of the vehicle driving system for the constant rotational speed of the engine can be treated as a stationary and ergodic signal – provided, that there are no abrupt load changes.
3. The vibration signal – based diagnostic autoregressive model (AR) of the vehicle driving system was proposed in the paper. In dependence of the subsystem being under diagnostics, the vibration signal must be properly prepared, which means that it should be filtered, synchronically averaged, or its autocorrelation function should be determined. The filter band selection – matching the model of the diagnosed subsystem – is also important.
4. This is an adaptive model, which means that its identification and diagnostics procedure is performed on-board in a way imperceptible for the driver.
5. The method of the on-line determination of the model coefficients was presented and its verification on the example of wearing out of the gearbox teeth, differential gear and triple joint was performed. For the selected defects the measures of vibration signals were determined and the residual signals were generated. On the basis of residual signals generated for the model and for the driving system in a good technical condition the model uncertainty was calculated.
6. Autoregressive models determined for the autocorrelation function of the vibration signal and for vibrations synchronously averaged were considered. In the first case the model is simpler (less coefficients) and is characterized by a smaller uncertainty, but using the normalized autocorrelation function it is only possible to state that the worn element is either in a good or bad state. In the second case the model has more coefficients, but it allows us to differentiate the wear state of the tested subsystem.
References
-
Kiciński J. Model based diagnostics – today and tomorrow. International Journal of COMADEM, Vol. 8, Issue 2, 2005, p. 17-22.
-
Cheli F., Pedrinelli M., Zorzutti A. Integrated Vehicle and Driveline Modelling. SAE Technical Paper, 2007-01-1583.
-
Dąbrowski Z., Komorska I. Identification of engine vibroacoustic model for diagnostics of mechanical defects. Proceedings of 12th Pan American Congress of Applied Mechanics, 02-06.01.2012, Port of Spain, Trinidad.
-
Komorska I. Vibroacoustic Diagnostic Model of the Vehicle Driving System. Radom: ITE-PIB, 2011.
-
Fakhfakh T., Chaari F., Haddar M. Numerical and experimental analysis of a gear system with teeth defects. International Journal of Advanced Manufacturing Technology, Vol. 25, 2005, p. 542-550.
-
Nagwa A., Nabil H., Magdy A. Dynamic Modeling of Vehicle Gearbox for Early Detection of Localized Tooth Defect. SAE Technical Paper, 2008-01-2630.
-
Tian Z., Zuo M. J., Wu S. Crack propagation assessment for spur gears using model-based analysis and simulation. Journal of Intelligent Manufacturing, Vols. 413-414, 2009, p. 299-304.
-
Ljung L. Recursive Identification Algorithms. Circuits, Systems and Signal Processing, Vol. 21, Issue 1, 2002, p. 57-68.
-
Ljung L. System Identification – Theory for the User. Prentice-Hall, Upper Saddle River, N. J., 1999.
-
Endo H., Randall R. B. Enhancement of autoregressive model based gear tooth fault detection technique by the use of minimum entropy deconvolution filter. Mechanical Systems and Signal Processing, Vol. 21, 2007, p. 906-919.
About this article
This research was performed under Habilitation Research Project No. N N509 349834, which was funded by the Polish Ministry of Science and Higher Education.
