Abstract
In this article, the technology of salt bath carburizing at low temperature (640 °C) is used to prepare the titanium carbide thin film on Ti6Al4V alloy surface. The processed alloy sample surface phase and elements are observed by XRD and EDAX. The hardness of sample surface and permeability layer are measured by the MH-3 type microhardness meter. And the friction and wear contrast tests of the uncarburized and carburized samples are carried out using the M2000 friction and wear testing machine. The results show that: high hard phase carbide Ti8C5 is generated on the sample surface. The processed sample surface hardness is 953.28HV, which is 2.57 times of the original; The friction and wear properties of the carburized sample improve significantly; At 100 N, the uncarburzed wearing loss is 29 times of the carburized wearing loss, and at 300 N, the friction coefficient is reduced by 55.9 %.
1. Introduction
Titanium and titanium alloy because of their high specific strength, good wear resistance, heat-resisting, no magnetic, good cryogenic mechanical properties and many other advantages, have been widely used in the fields of aviation, aerospace, ships, chemicals, automotive, biomedical, etc. [1-4]. In biomedical applications, titanium alloy has gradually become the first choice for hard tissue replacement and repair materials, mainly used for artificial joints [5, 6]. At present, the titanium alloy widely used in clinical is still given priority to with Ti6Al4V alloy. But the poor wear resistance of Ti6Al4V alloy limits its further application [7, 8]. It is one of the most economical and effective technical ways to solve the problem of wear resistance of titanium alloy by coating and modifying on the surface of Ti6Al4V alloy. In order to improve the wear resistance of medical Ti6Al4V alloy, the commonly used surface coatings are Diamond-like carbon (DLC) film, titanium carbide (TiC) coating and so on [9, 10]. It is a simple and effective method to improve the surface properties of titanium alloy by preparing titanium carbide thin films on the surface. Common carburizing methods are solid carburizing, gas carburizing, plasma carburizing and so on [11], but their test temperature is very high (about 1000 °C). In this article, the Ti6Al4V alloy is carburized in salt bath, which significantly reduces the test temperature, simplifies the test procedure and improves the friction and wear properties of the alloy.
2. Method for preparing titanium carbide thin film
2.1. Test material
The block Ti6Al4V alloy used in this experiment is a typical α+β type titanium alloy, and its main chemical composition (mass fraction) are Al 5.5-6.8 %, V 3.5-4.5 %, Fe ≤0.3 %, C ≤0.1 %, N≤0.05 %, H≤ 0.015 %, O≤ 0.2 % and the allowance for Ti, the size of which is 30 mm×10 mm× 7 mm.
2.2. Test method
The based salt used in the experiment is composed of urea ((NH2)2CO) and carbonate (K2CO3 and Na2CO3). The test process is: the degreasing cleaning-preheating-salt bath carburizing-de salt washing-drying for oil impregnation. Process parameters: preheating temperature is 500 °C and preheating time is 45 min; holding time after radical salts melt is 4 h; salt bath carburizing temperature is 640 °C and Carburizing time is 3.5 h.
XRD and EDAX detection are performed on the tested specimens to expect that carbon element infiltrates the sample after carburizing and generate high hard phase carbon titanium compound.
In this experiment, the infiltrated layer microhardness variation of the samples before and after salt bath carburizing is measured by MH-3 type microhardness meter. The load is 100 g and the holding time is 15 s. And ten points are randomly measured at the same longitudinal position during measurement and then the result is the average value of the ten measurements.
At normal temperature, the friction and wear test was carried out by using M2000 friction and wear testing machine, and the friction and wear properties of the samples before and after carburizing are compared according to the test results. The friction and wear tests are carried out under the load of 100 N, 200 N, 300 N and 400 N, respectively and each test is dry friction test, which is carried out at the speed of 200 r/min and 10 min friction time. The grinding ring material is 42CrMo and its average hardness is 48HRC. The wear rate of samples before and after wear test is weighed by the precision electronic balance for 1mg (Model for JA2103N).
3. Test mechanism analysis
3.1. Reaction mechanism
Preheating and carburizing are the main processes of this experiment. And the specimen is preheated in the furnace to expect the oxidation is reacted between the alloy surface and the oxygen in the air, which could generate titanium oxide so as to promote the infiltration of carbon: 2Ti+O2→2TiO; 8TiO+5[C]→Ti8C5 +4O2.
Carburizing is carried out in the salt bath, and at the salt bath temperature, urea ((NH2)2CO) in based salt would be decomposed to generate cyanic acid (HCNO), which could make the salt bath contain a certain mass fraction of thiocyanate. At the operating temperature, thiocyanate would be decomposed to generate CO and CO would further break out the carbon atoms which could penetrate into the workpiece surface to form carbide or solid solution: (NH2)2CO→NH3+HCNO; 4CNO-→CO32-+2CN-+CO+2[N]; 2CO→CO2+[C]; 8Ti+5[C]→Ti8C5.
3.2. XRD analysis
From the XRD map (Fig. 1), it is known that Carbon and titanium compounds Ti8C5 is formed in the Ti6Al4V alloy infiltrated layer, and Ti8C5 is a hard phase carbide, which plays an important role in improving the surface hardness and wear resistance of Ti6Al4V alloy.
3.3. EDAX energy spectrum analysis
From Fig. 1 and Table 2, we can see that the surface layer of carburized Ti6Al4V alloy contains elements such as Ti, Al, V, O and C, etc. And the weight percentage of the element C was 7.56 %. However, the mass fraction of C contained in the original Ti6Al4V specimen for testing is C ≤0.1 % and by comparison, it can be found that the carbon element has been infiltrated into the Ti6Al4V alloy surface. By Fig. 1 and Fig. 2, we can see that in the infiltrated layer, the infiltrated carbon and titanium in the original sample form the Ti8C5 composite layer, and the hardness and wear resistance of the layer are obviously improved because of the existence of Ti8C5 in the infiltration layer, which could be further confirmed from the Fig. 3 and Fig. 5.
Fig. 1XRD of carburizing layer of Ti6Al4V
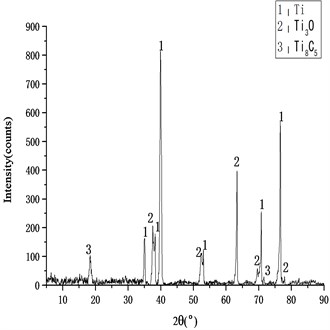
Fig. 2EDAX of carburizing layer of Ti6Al4V
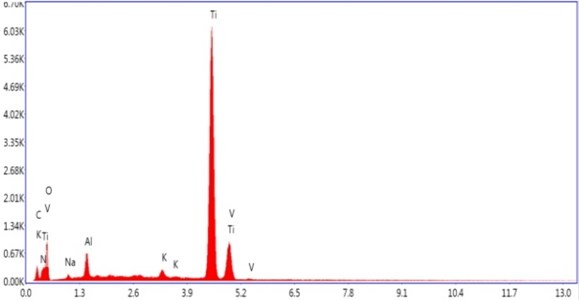
Table 1EDAX element weight percentage and atomic percentage
Element | C | N | O | Na | Al | K | Ti | V |
Weight (%) | 7.56 | 0.01 | 32.84 | 1.35 | 2.66 | 1.04 | 52.96 | 1.58 |
Atomic (%) | 15.73 | 0.02 | 51.27 | 1.47 | 2.46 | 0.66 | 27.62 | 0.77 |
3.4. Hardness analysis
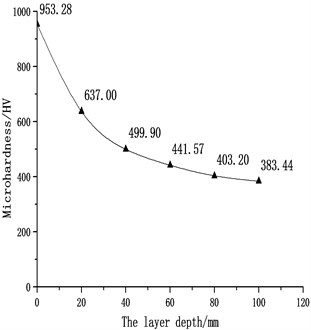
The original surface hardness of the sample is 370.65HV and the hardness curve of the measured permeability layer microhardness along the layer depth is shown in Fig. 3. From Fig. 3, we can see that the surface hardness of Ti6Al4V alloy after salt bath carburizing treatment is greatly improved. The surface hardness of the carburized sample is 953.28HV, which is 2.57 times as much as the original specimen surface hardness. The layer hardness decreases gradually from the outside to the inside and finally is close to the matrix hardness. The sample surface hardness is mainly improved by the formation of the hardening phase Ti8C5 in the infiltrated layer. The sample surface hardness is mainly improved by the formation of the hardening phase Ti8C5 in the infiltrated layer and the solid solution of carbon element. At the beginning, the layer hardness is rapidly declining because the carbon content decreases with the layer depth, and the carbon content decline will inevitably reduce the Ti8C5 generation, so the hardness will decrease rapidly. When the layer depth is more than 40 μm, the decline rate of the hardness curve becomes slow and tends to be stable, and this is because the carbon content is very little when the layer depth is more than 40 μm, which has little effect on the hardness of the infiltrated layer, and the hardness finally tends to be equal to the sample matrix hardness.
Fig. 3Micro-hardness curve of Salt bath carburizing layer from outside to inside
3.5. Friction and wear performance analysis
The curves of positive pressure and friction coefficient measured in the experiment are shown in Fig. 4, and it can be seen from the figure that the carburized specimen friction coefficient is obviously smaller than that of the original sample. At the 300 N pressure, the friction coefficient is decreased from 0.34 before carburizing to 0.15 after carburizing and is reduced by 55.9 %, which shows that the carburizing process improves the friction property of the alloy specimens surface. The test is carried out at low speed, so the effect of the friction pair thermal conductivity on friction coefficient is not significant. The friction coefficient decreases with the increase of the positive pressure before and after carburizing, and the reasons are as follows: with the increase of the positive pressure (elastic deformation is not saturated), the close amount between test piece and the grinding ring is increased, and the increasing speed of real contact area is greater than the increasing speed of pressure, so all of the contact pressure, plastic deformation and shear friction are reduced, which lead to the decrease of friction coefficient [12, 13]. In addition, the carburized curves show the trend of decreasing first and then increasing, which is because the film formed by carburizing is very thin.
When the pressure is increased to 400 N, the mass wear loss increases at the same friction condition and the generated infiltrated layer film is worn to the matrix, therefore, the friction coefficient will show an increasing trend.
Fig. 4Curves of positive pressure and friction coefficient before and after carburizing
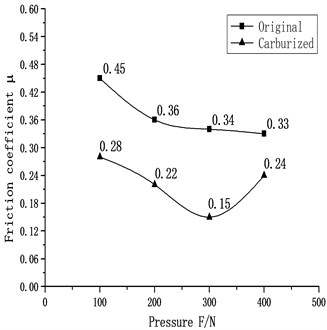
Fig. 5Mass wear loss contrast curve of Specimens before and after carburizing
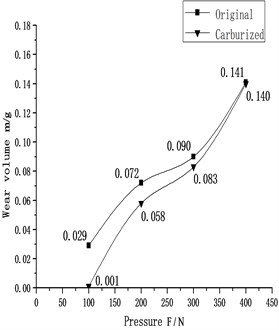
From the Fig. 5, we can see that the wear resistance of Ti6Al4V samples carburized in salt bath improved obviously. At the 100 N test load, the mass wear loss of the original Ti6Al4V is 29 mg. And that is 29 times as much as the mass wear loss (1 mg) of carburized alloy sample. This result is because the Ti8C5 thin film is generated on the surface of the carburized alloy sample. Ti8C5 is a hard phase carbide, which improves the wear resistance of the alloy surface. With the increase of the test load, the mass wear loss of the alloy sample before and after carburizing is increased gradually, but in the two cases, the difference of mass wear loss is gradually reduced. When the test load is increased to 400 N, the two kinds of mass wear loss are almost equal, and the main reason is that the Ti8C5 thin film formed on the surface of Ti6Al4V alloy sample is relatively thin. As the load increases, titanium carbide thin film has been worn for shorter time, and the time of friction with the alloy matrix increases. So it would make the gap between the two kinds of mass wear loss gradually reduce and even tend to be equal.
At 100 N load condition, wear surface topography pictures of two kinds of samples are shown in Fig. 6(a) and (b). From two figures, it can be seen that the surface wear forms of the two samples are abrasive wear. The furrows generated by abrasive sliding on the carburized sample (Fig. 6(a)) surface are lighter and less. And the reasons are as follows: after carburizing treatment, a compound layer with high hardness is generated in the sample surface; under the abrasive wear condition, the alloy surface belongs to the micro cutting state, and carbide hard points are generated in the compound layer, so the wear resistance of the surface is greatly improved.
Fig. 6Worn surface morphologies of original sample and carburized sample under different load
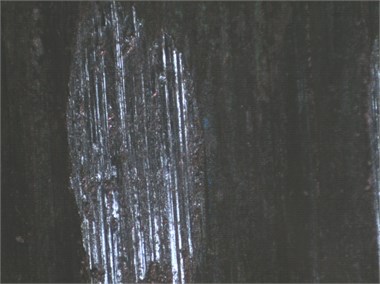
a) 100 N carburized sample
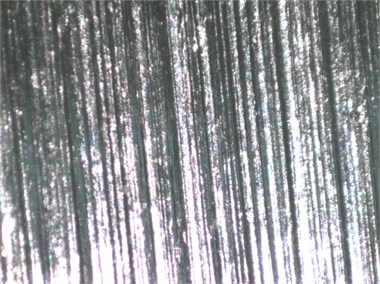
b) 100 N original sample
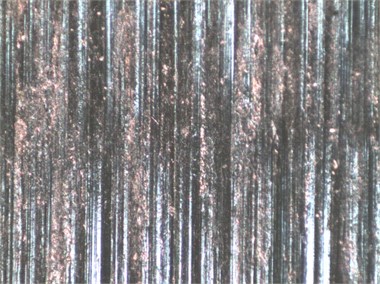
c) 400 N carburized sample
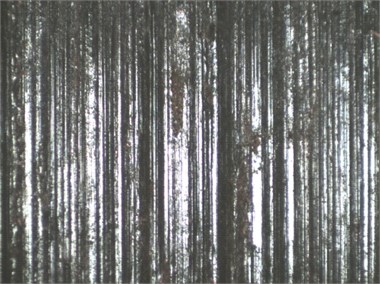
d) 400 N original sample
At 400 N load condition, wear surface topography pictures of two kinds of samples are shown in Fig. 6(c) and (d). From two figures, it can be seen that the surface wear forms of the two samples are still abrasive wear. However, the difference of the depth and number of furrows generated by abrasion in the two samples surface is not very obvious. And the reasons are as follows: the compound layer formed by the carburizing process is very thin, and when the load is increased to 400 N, the mass wear loss increases at the same time (as is shown in Fig. 5), which makes the generated hardening thin film in the surface be worn(that has been shown in Fig. 4 and Fig. 5); Fig. 6(c) is the surface morphology characteristic of the alloy specimen matrix after the hardening film being worn, which has little difference on the surface morphology of the original specimen (Fig. 6(d)).
4. Conclusions
1) The diffusion layer of Ti8C5 which is high hard phase carbon titanium compound is generated in the surface of the Ti6Al4V alloy carburized in salt bath at low temperature forming a diffusion layer containing high carbon hard phase titanium compound Ti8C5.
2) The surface hardness of the carburized sample is 953.28HV, which is 2.57 times as much as the original specimen surface hardness. The hardness of the infiltrated layer gradually decreases with the increase of layer depth and eventually tends to be equal to the matrix hardness.
3) At the condition of room temperature and dry friction, the wear resistance of the carburized Ti6Al4V alloy sample is greatly improved, and the mass wear loss is decreased significantly. And under the 100 N condition, the mass wear loss is reduced from the original 29 mg to 1 mg. And the friction coefficient of the carburized sample is also significantly reduced. At the 300 N condition, the friction coefficient is decreased from the original 0.34 to 0.15 and is reduced by 55.9 %.
References
-
Zhang Gaohui, Zhang Pingze, Cui Caie, Guo Lina, Pan Junde, Xu Zhong Status and prospect of surface treatment for titanium alloys. World Sci-tech R&D, Vol. 4, 2003, p. 62-67.
-
Chen Fei, Zhou Hai, Zhahg Yue-Fei, Tang Bin, Pan Jun-de Friction and wear behavior of non-hydrogen carburizing layer on titanium alloy surface prepared by arc-added glow discharge plasma. Tribology, Vol. 2, 2005, p. 121-125.
-
Guo Hua-feng, Sun Tao, Li Ju-li, Yang Hai-feng Microstructure and performance of Ni-based WC coatings prepared by plasma spraying on TC4 titanium alloy surface. China Surface Engineering, Vol. 2, 2013, p. 21-28.
-
Gurrappa I. Characterization of titanium alloy Ti-6Al-4V for chemical, marine and industrial applications. Journal of Materials Processing Technology, Vol. 51, Issues 2-3, 2003, p. 131-139.
-
Wei Chao, Luo Yong, Qiang Ying-hai, Ge Chang-lu Carburizing technology and wear resistance of titanium alloy. Materials for Mechanical Engineering, Vol. 1, 2008, p. 34-36.
-
Marin E., Offoiach R., Regis M., Fusi S., Lanzutti A., Fedrizzi L. Diffusive thermal treatments combined with PVD coatings for tribological protection of titanium alloys. Materials and Design, Vol. 89, 2016, p. 314-322.
-
Li Jun, Yu Zhishui, Wang Huiping, Li Manping Microstructural characterization of titanium matrix composite coatings reinforced by in situ synthesized TiB + TiC fabricated on Ti6Al4V by laser cladding. Rare Metals, Vol. 5, 2010, p. 465-472.
-
Zhang Wen-guang, Wang Cheng-tao, Liu Wei-min Tribological behavior of surface-modified layers on Ti alloy. Tribology, Vol. 2, 2003, p. 91-94.
-
Jin Hong Research status of biomedical titanium alloys and its surface modification. Rare Metals, Vol. 6, 2003, p. 794-798.
-
Ananth M. Prem, R. Ramesh Reciprocating sliding wear performance of hard coating on modified titanium alloy surfaces. Tribology Transactions, Vol. 581, 2015, p. 169-176.
-
Ji Shouchang, Li Zhengxian, Du Jihong, Wang Shaopeng, Wang Baoyun, Huang Chunliang, Pan Xiaolong Analysis of hydrogen-free carburized coating on Ti6Al4V substrate. Rare Metal Materials and Engineering, Vol. 12, 2010, p. 2152-2156.
-
Li Feng, Wang Anmin, Wang Chengtao Tribological behavior of articular cartilage against medical stainless steel. Tribology, Vol. 1, 2016, p. 42-47.
-
Yoshikiyo Tamai, Toru Inazumi, Ken-ichi Manabe FE forming analysis with nonlinear friction coefficient model considering contact pressure, sliding velocity and sliding length. Journal of Materials Processing Technology, Vol. 227, 2016, p. 161-168.

