Abstract
Wire rope tension is one of the vital monitoring parameters for the hoister system, which seriously influence mine coal safety production. However, wire ropes endure vibration and shock in lifting process of multi-rope friction hoisters in coal mine, which interferes with measurement of wire rope tension and lifting load seriously. Aimed to the difficulty of monitoring wire rope tension, this paper put forward a new measurement method of wire rope tension by transferring wire rope tension measurement to pressure measurement, which improves the measurement safety and avoids the safety hazards of adopting pull sensor in series with wire rope, and this paper also designed an acoustic filtering sensor which uses the filtering characteristic of acoustic cavity to eliminate the effect of vibration and shock in wire rope tension measurement. Meanwhile, a novel wire rope tension monitoring device of multi-rope friction hoister is presented based on the proposed measurement method and sensor, which can measure each wire rope tension in the lifting process, display the cage load and monitor the fault of wire rope tension unbalance. Real-time and accurate wire rope tension measurement is realized. By comparing the signals measured by the common sensor and the acoustic filtering sensor, the influence of vibration and shock on the multi-ropes tension measurement is eliminated, and the fault of wire rope tension unbalance can be monitored. This advanced tension monitoring device is of great significance to the safety of coal mine production.
1. Introduction
Multi-rope friction hoister has an advantage of high reliability and larger capacity. Compared to single-rope hoister, the wire ropes don’t twine on the rollers so that the capacity of rope does not need to be considered and the volume of the hoister is much smaller. Manufacture and transportation of multi-rope friction hoister is simple and it is widely used to lift rocks, equipment and workers in coal mine. The safety operation of multi-rope hoister is the key to mine production. The common faults of multi-rope hoister such as overload and unbalance of wire rope tension can lead to fault of the fatigue, wearing, life decrease and break of wire ropes and wearing increase between wires rope and lining [1-6]. In order to ensure the safety of the hoister system, lifting load, wire rope tension and unbalance degree should be monitored, so real-time wire rope tension monitoring device for multi-rope friction hoister is needed.
Many authors have studied of wire rope tension monitoring method such as mark method [7] and transverse-impulsive vibrational wave method [8]. Those methods are static measurement and can’t be used to measure tension when hoister is running. To realize dynamic measurement, Yao Wenbin and Shao Qianjun studied wire rope tension meter. The meter is designed according to the principle of three points loading flexure and consists of three rollers. The meter measures wire rope tension by measuring pressure which is formed when wire rope goes through three rollers [9]. An Wei and Wei Renzhi designed a new type differential capacitive sensor for wire rope dynamic tension. The sensor is of anti-interference and high sensibility [10]. Jin Huawei and Zhang Xin designed a kind of sensor used for measuring the tension of steel ropes directly. The sensor worked on the strain shear measuring principle [11]. Zhang Xiaochun made the research of stress monitor and broken testing for steel wire rope. He proposed a dynamic monitoring method by installing pressure sensor between wire rope and cage. The monitor of wire rope stress was changed to observe of sensor pressure, and the pressure sensor was adopted for measuring stress, testing pull became testing press. The method can realize real-time and dynamic monitoring of wire rope tension [12]. Zhang Ru and Duan Yuanfeng proposed EME sensor for stress monitoring of steel cables. The EME sensor is composed of a magnetic excitation part and a smart ME sensing unit. According to the relationship between magnetic field and stress of steel cable, the sensor can measure the stress of steel cable and the tension of steel cable [13]. Y. Lei and W. A. Shen used the fast Fourier transform and peak-picking algorithm implemented in the wireless sensing to provide a simple and efficient approach for estimating the modal frequencies and mode shapes of a structure. The results can also be used to estimate forces in bridge cables [14]. Those methods can realize dynamic and real-time monitoring of wire rope, but wire rope will vibrate when hoister operates which generates noise signal to interfere tension measure. So those methods need filter algorithm which increase the complexity of testing system.
For multi-rope friction hoister, except for above measure method, there is another common method for measuring wire rope tension by oil pressure sensor. This method installs four oil pressure sensors in each balance cylinder and wire rope tension can be got according to the oil pressure and the section area of cylinder. Hoister’s load can be achieved by adding each wire rope’s tension. Though this method can filter out the noise signal, these 4 balance cylinders actually form a communicating vessel, and oil pressure of each balance cylinder is equal, which makes it impossible to detect the unbalance tension of wire ropes.
In order to monitor each wire rope tension, this paper put forward a new measurement method of wire rope tension. The method can transform wire rope tension measurement to pressure measurement by installing sensors between pistons and sliding blocks without changing the original structure of hoister device, which is helpful for the safety of hoister. This paper designed an acoustic fitter sensor. This sensor can filter out noise signal in the lifting process of hoister so that can accurately measure each wire rope tension. This paper also designed a wire rope tension monitoring device for multi-rope friction hoister device based on the proposed sensor. The device can measure each wire rope tension, calculate and display cage load and the difference of wire rope tension, and estimate whether the hoister is under malfunction.
2. The measurement device of wore-rope tension by using acoustic filtering sensor
2.1. The composition of wire rope tension monitoring device for hoister
In order to eliminate the interference of noise signal and measure the tension of wire rope accurately, this paper presents a wire rope tension monitoring device based on acoustic filtering sensor. The device can measure each tension of wire rope and calculate the load of cage, and it also can estimate wire rope tension unbalance and display the over load fault and the degree of tension unbalance.
The overall structure of this device is shown as Fig. 1. The sensor 3 is set between each balance oil cylinder and its pedestal (sliding block) to acquire wire rope tension signal. The tested signal is transmitted to wireless communication module 2 by data acquisition unit 1 and 6, after that, wireless communication module transmits the signal to wireless receiver device 12, then the signal is transmitted to the ground by communication cable and RS485/232 converter 11, Finally, upper computer 10 processes the signal to complete the wire rope tension monitoring. To ensure the position of the cage, hall sensor 8 is set to record the rotation angle of the drum to get the cage’s position. On the pithead, there is a location switch 7 to ensure whether cage A and B reaches to the pithead or not. Meanwhile, location switch 7 is also set as the basis of hall sensor reset. There is a displacement sensor 4 to avoid the piston beyond the balance cylinder’s adjustment stroke.
The shaft bottom tension data is the key to determine whether cage is overload. Because of mineshaft’s high absorption to electromagnetic wave, the device designs two wireless receiver modules which are set on the top and at the bottom of shaft. The wireless receiver module set on the top of shaft is used to receive the tension data from upper cage, the other wireless receiver module set at the bottom of shaft is used to receive the tension data from lower cage. In this paper, there are four wire ropes to lift cages, so there are four sensors to measure each wire rope’s tension of big cage and other four sensors to measure each wire rope tension of small cage. These tension data are transmitted to two wireless receiver modules by its own wireless transmission module. Upper computer decides to read tension data from receiver module which is close to the cage. By this way, we can avoid the unreliability of long distance of wireless transmission.
Fig. 1Overall structure of monitoring device: 1 − data acquisition unit A, 2 − wireless communication module, 3 − tension sensor, 4 − displacement sensor, 5 − balance oil cylinder, 6 − data acquisition unit B, 7 − cage position switch, 8 − hall sensor, 9 − the measurement device of cage travel, 10 − upper computer, 11−RS485/232 transfer, 12− wireless receiver device
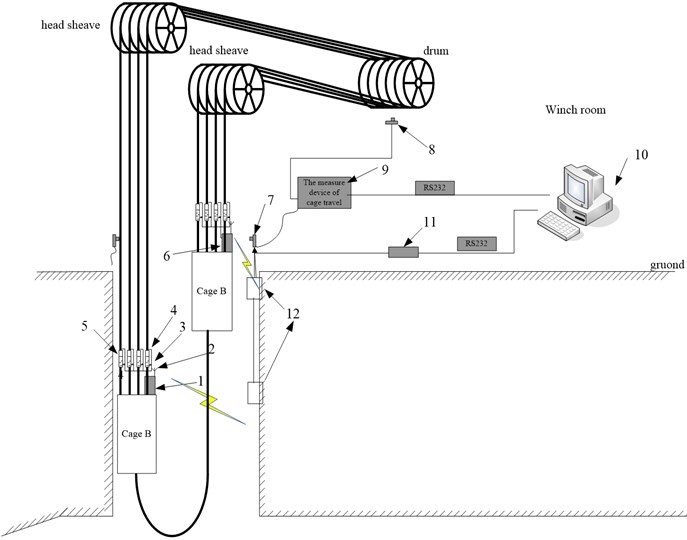
A responsive communication mode is set between transmission and receiver module, once transmission module receives the command from receiver module, data acquisition unit would confirm the command and send data by A/D convertor as specific communication protocol. Upper computer receives and verifies the data, then analyzes and packs the data. In entire measurement process, the noise signal is filtered by the acoustic filtering sensor, the accurate tension signal can be monitored, and the lifting load can also be calculated by adding each wire rope tension. By this way, the device can monitor wire rope tension of two cages real time and accurately.
2.2. The measurement method of wore-rope tension device
In order to overcome the shortcoming of low accuracy and unreliability of traditional measurement method and ensure the safety of operating of hoister, a new measurement method of wore-rope tension is presented in this paper. In the coal mine lifting processing, a tension self-balancing device is set between wire ropes and cage to keep each wire rope tension balancing. This device is composed of four balance oil cylinders. One of balance oil cylinders’ structure and the installment position of sensor are shown in Fig. 2. The balance oil cylinder consists of inner plate, sliding block, side plate and oil cylinder. The end of inner plate is lifting end connected with wire rope, and the other end is connected with sliding block. The end of side plate is loading end connected with cage, and the other end is connected with oil cylinder. By the structure, oil cylinder is set between side plate and sliding block and bears pressure from side plate and inner plate.
According to its structure characteristic, the tension of wire rope is equal to the pressure between sliding block and piston when the friction is ignored between sliding block and side plate. In order to measure the pressure, the sensor is set between piston and sliding block as shown in Fig. 2(a). By this way, the pressure between sliding block and piston can be measured to replace of wire rope tension. The piston gives pressure P1 to the top of the sensor and the sliding block gives pressure P0 to the bottom of the sensor as shown in Fig. 2(b). When the acceleration of senor is ignored, pressure P1 is equal to pressure P0 and also equal to the tension of wire-rope. The pressure can be got easily by the sensor, and tension measurement is transferred to pressure measure. The method avoids the security measurement problems by making pull sensors in series connection with wore-rope directly in the coal mine lifting processing. Meanwhile, this measurement method doesn’t need to change the structure of entire lifting device, which is asked by the coal mine safety rules. So the measurement method is safety and reliable for wore-rope tension in the coal mine lifting process.
Fig. 2The structure of balance oil cylinder and the installment of pressure sensor
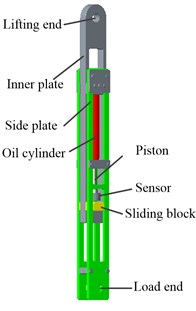
a)
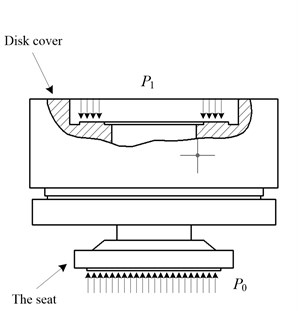
b)
3. The structure design and filtering principle of acoustic filtering sensor
3.1. The structure design and measurement principle of acoustic filtering sensor
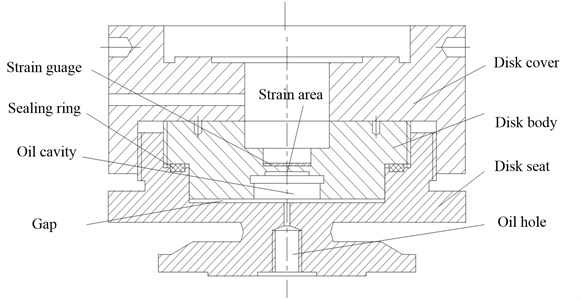
In the lifting process of hoister, there is friction between cage and cage pathway, and wire rope also subject to the vibration and shock, those factors will produce noise signal interfering with lifting load and wire rope tension measurement. To measure wire rope tension in the lifting process of hoister accurately, a new pressure sensor is designed according to the structure characteristics and functional requirements of multi-rope friction hoister. Fig. 3 shows the structure schematic of this pressure sensor. This sensor is mainly composed of a disk cover, a disk body and a disk seat. The disk cover is used to support external load, which connects with disk body by screw joint. As for the disk body, strain area is set to measure the signal of external load. The disk seat is set to support the sensor. Meanwhile, the oil cavity and gap are formed when disk body connects with disk seat, and sealing ring is set to seal oil in the oil cavity and adjust the width of gap.
In the process of wire rope tension measurement, the sensor subject to pressure from piston and sliding block which results in change of the volume of oil cavity and oil pressure inside the sensor. Under the effect of oil pressure, strain occurs in the sensing area. If we analyze the signal of the strain area, the tension of wire rope can be achieved. In fact, the external load signal is transferred to oil pressure signal firstly then to strain signal in the measurement process. In this process, the vibration energy is absorbed and noise signal is filtered out.
Fig. 3The structure of acoustic filtering sensor
3.2. The filtering principle of acoustic filtering sensor
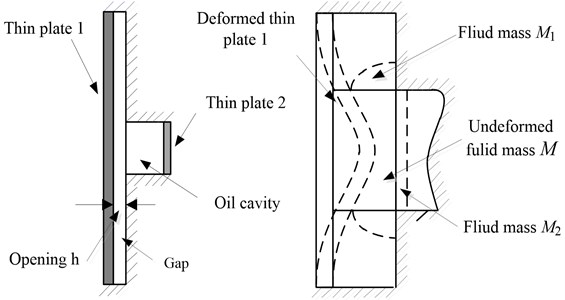
To study the filtering characteristic of the sensor, filtering characteristic model of sensor need to be established. In order to discuss the filtering principle of the sensor, the structure of disk seat contacted with fluid is simplified as thin plate 1, and the strain area is simplified as thin plate 2. So oil cavity’s structure diagram is shown as Fig. 4. When the sensor subjected to the external steady static pressure, plate 1 will bend, which makes the fluid of solid frame to flow into the gap and the oil cavity. Suppose the mass of fluid flowing into gap is M1 and the mass of fluid flowing into the oil cavity is M2. The equivalent mass of thin palte1 is Mm. If the sensor subjected to alternate load at the same time, the equivalent mass Mm will vibrate, which makes the fluid mass M1 and M2 vibrate. In the vibration process, the fluid will subject to the resistance from oil cavity and gap. Because of the opening of gap is small, there is damp in the opening of gap which can absorb the kinetic energy of fluid. By this way, the effect of vibration and shock on the strain area can be eliminated, and the sensor can filter noise signal.
Fig. 4The structure diagram of oil cavity
Due to the low frequency of vibration signal in engineering, generally below 10 KHz, the size of the structure is far smaller than the wavelength of the structure’s elastic wave. Therefore, in the range of sensor’s structure feature, the parameters of the wave won’t change numerically too much. Therefore, the model of sensor can be equivalent to the lumped parameter model, which avoids complicated discussion of distributed parameter system.
For oil cavity, because its radius is bigger, its acoustic resistance is ignored, and acoustic conductor Co can be used to describe its acoustic characteristic. For gap, because its width is smaller, the acoustic conductor Cg and acoustic resistance Rg can be used to describe the characteristic of gap.
For establishing a vibration model, the compressibility of oil should be taken into consideration. The compressibility of oil can be described as Eq. (1) [15]:
where β is the compressibility coefficient of oil, Δp is the variation of pressure, V0 is the initial volume of oil cavity.
When the amplitude of the fluid is smaller, the speed of wave can be described as Eq. (2):
In order to establish the relation between fluid pressure and volume, Δp can be described as Eq. (3):
where ρ0 and c0 are the density and wave velocity of fluid. If standard atmosphere is set as zero, then Δp is equal to p.
Suppose the fluid vibration amplitude is small, the pressure variation is far smaller than initial pressure. Taking the fluid flowing into gap and oil cavity as the research object, according to above assumptions, the vibration model of sensor can be described as the Fig. 5.
For thin plate 1, the dynamic equation can be described as Eq. (4):
For fluid flowing into gap, the dynamic equation can be described as Eq. (5):
For fluid flowing into oil cavity, the dynamic equation can be described as Eq. (6):
For pressure p, substitute S0, S1, S2, x, y1, y2 into Eq. (2), Eq. (3) can be got:
where x is the equivalent displacement of plate 1, S0 is the equivalent acoustic area of thin plate 1, y1, y2 is the equivalent displacement of fluid M1, M2, and S1, S2 is the equivalent acoustic area of gap and oil cavity, and p is the oil pressure in the sensor.
Fig. 5The vibration model of the sensor
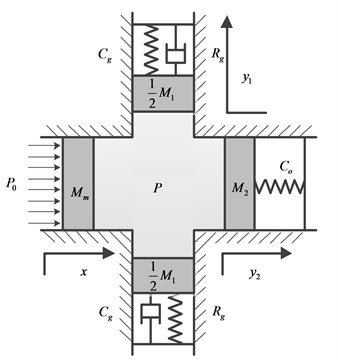
If the parameters are designed to make the natural frequency of M1 closed to noise frequency, the M1 will generate resonance, which makes the amplitude of M1 increase. Under the action of fluid resistance Rg, the vibration energy of fluid will be absorbed by gap, and the vibration of M2 will be reduced so that the oil pressure acting on the thin plate 2 (strain area) will be relatively steady and doesn’t change too much. which is good for the signal stability. By this way, the effect of noise on strain area will be filtered out.
To verify the filtering characteristic of the sensor, this paper use LMS Virtual.Lab/Acoustic to simulate. In this simulation, dimethy silicone (MSDS) is chosen as oil in the sensor, and its density is 963 kg/m3. The speed of sound in the oil is 1275 m/s. The material of sensor is steel, the parameters of sensor is shown as Table 1.
Table 1The structure parameters of the sensor
Serial number | Name | Value |
1 | The radius of thin plate1 | 35 mm |
2 | The thickness of thin plate1 | 5 mm |
3 | The thickness of thin plate2 | 1.5 mm |
4 | The density of oil | 963 kg/m3 |
5 | The sound velocity of oil | 1275 m/s |
6 | The density of steel | 7860 kg/m3 |
7 | Young modulus of steel | 2.06e11 N/m2 |
8 | Poisson ratio of steel | 0.3 |
Taking the fluid in the sensor as research object, it will create elastic wave in the fluid when exciting force acts on the thin plate1. The wave will reflect, refract on the fluid boundary when it spread in the medium. So boundary conditions must be set correctly before simulation is carried out to ensure the correctness of calculation.
Because the radial thickness of sensor is large, the fluid cylinder surface connected with sensor hardly occur deformation when the pressure changes in the fluid so it can be seen as rigid boundary.
The equivalent stiffness of clamped support thin circular plate can be calculated as following Eq. (8) [16]:
where E and μ are the young modulus and Poisson ratio of the material of thin plate, h is the thickness of thin plate, a is the radius of thin plate. According the simulation parameter, the equivalent stiffness ratio α of thin plate1 and thin plate 2 can be calculated as Eq. (9):
In this simulation, the largest radius of plate 2 is 14 mm, so a2 is equal to 14 mm above Eq. (9) the equivalent stiffness ratio: α= 0.00432. K2 is far more than K1 and the deformation of thin plate 2 can be ignored. So the fluid surface connected with thin plate 2 can be seen as rigid surface and the fluid surface connected with thin plate 1 can be seen as couple surface.
From the above, the boundary conditions can be set as show in Table 2.
Table 2The boundary conditions of the simulation model
Fluid surface | Boundary conditions |
Surface connected with thin plate 1 | Couple surface |
Surface connected with thin plate 2 | Rigid boundary |
Fluid cylinder surface | Rigid boundary |
To ensure the calculation accuracy of fluid FEM model, the number of fluid elements and types of elements also need to be set. For the calculation of fluid, the number of elements should be at least six in a wave length. For the noise from hoister operation, the noise frequency range of interest was limited from 0 to 10000 Hz. The sound velocity of oil is 1275 m/s, so the shortest wave length can be calculated as Eq. (10):
So the largest length of element L can be got as Eq. (11):
By the calculation λmin= 127.5 mm, Lmax= 21.25 mm. Consider the structure size of sensor and ensure the calculation accuracy of FEM model, the size of elements is set as 1 mm.
Fig. 6The point A and B in the gap and oil cavity
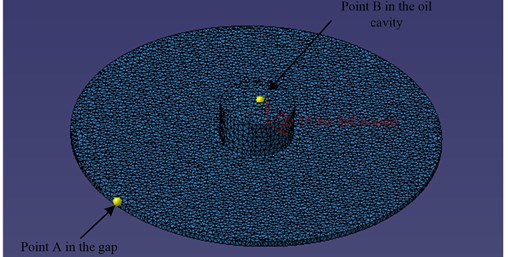
In this simulation, exciting force acts on the circle center of thin plate 1, and its value is 1000 N. The type element of fluid and structure both choose tetra mesh. The mechanical parameters of fluid and structure are equal on the couple surface. The mechanical parameters of plate 1 can be mapped to fluid by couple surface and the fluid will vibrate. When the radius of plate 2 is 7 mm, the fluid model can be meshed as shown in Fig. 6. The point A and B in gap and oil cavity are chosen to study the vibration characteristic of sensor. The filtering characteristic of designed sensor can be studied by comparisons of the pressure of point A and B.
Fig. 7 shows the FEM mesh – results of FEM computations with 8500 Hz exciting force. The largest pressure occurs in the edge of gap and the pressure is smaller on the surface connected with thin plate 2, which means the vibration energy is absorbed by the gap. So the effect of dynamic load on the plate 2 (strain area) is small.
Fig. 7The FEM mesh – results of FEM computations with 8500 Hz exciting force
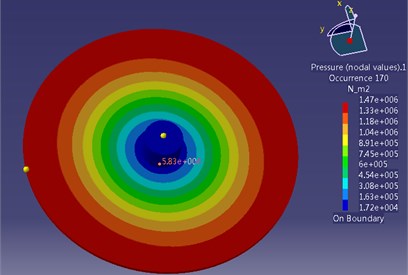
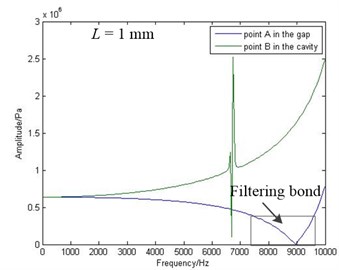
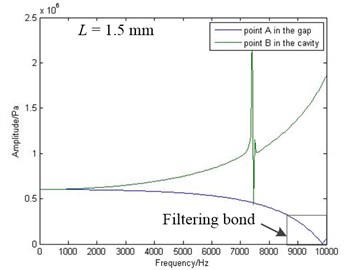
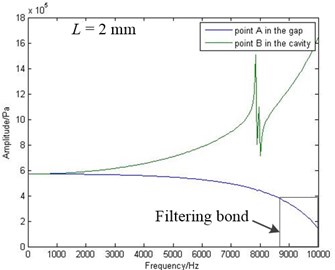
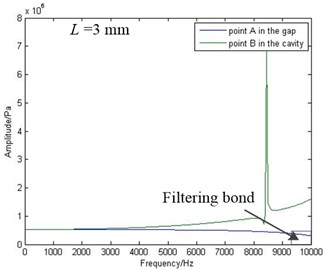
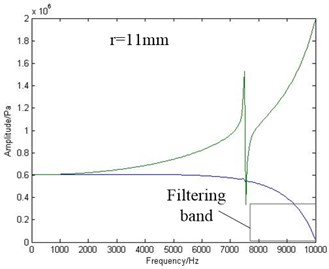
Fig. 8 shows the amplitude frequency curves of point A and point B when the width of gap is set to 1, 1.5, 2 and 3 mm. As shown in the Fig. 8, the pressure amplitude of point B will reduce and the pressure amplitude of point A will increase with the frequency of exciting force increasing, which means that the vibration energy flowing to gap, the energy flowing to oil cavity reduces and the effect of vibration and shock on stain area is reduced.
Fig. 8The amplitude frequency curve of point A and point B
a)
b)
c)
d)
Fig. 9The amplitude frequency curve of point B
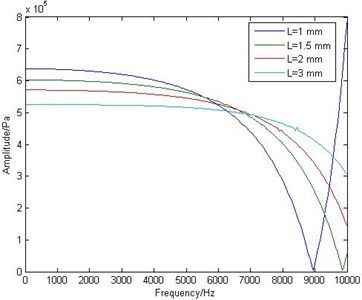
Fig. 9 shows the effect of width of gap on filtering characteristic. With the width of gap decreasing, Filter frequency band would move to low frequency, which contributes to filter noise with low frequency. In addition, the filtering ability would be better when the width of gap becomes small. So sensor is designed with the width of gap should be small.
Fig. 10The amplitude frequency curves of point A and B
a)
b)
c)
d)
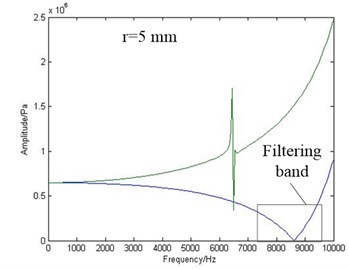
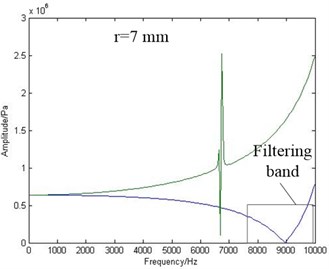
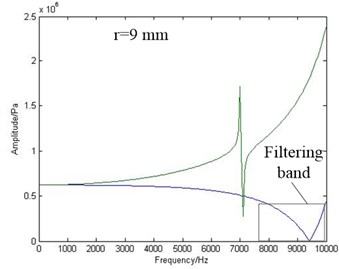
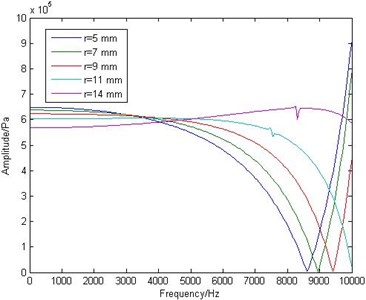
To study the effect of strain area radius on filtering performance, the radius of strain area is set series value. Fig. 10 shows the amplitude frequency curves of point A and point B when the radius of strain is set to 5, 7, 9, 11 mm. As shown in Fig. 10, with the radius of strain area increasing, the filtering band moves to high frequency. From Fig. 11, when the radius of strain area becomes 14 mm, the pressure amplitude turns a rising trendy which is bad for filtering performance of the sensor. According to Figs. 8-11, the sensor should be designed with a narrow gap and a small radius of strain area.
Fig. 11The amplitude frequency curves of point B
4. Experimental study and data analysis
4.1. The calibration of the measurement system
In order to ensure the measurement accuracy of the acoustic filtering sensor, the calibration experiment of the sensor and measurement system was carried out. The calibration of sensor is shown as Fig. 12, there are two sensors used in the experiment. The top sensor is the acoustic filtering sensor and the other sensor is a standard spoke-structure sensor which is used to calibrate acoustic filtering sensor. Two sensors are supplied by DC power. Displayer I is used to display the pressure value of spoke-structure sensor, and displayer II is used to display the pressure value of acoustic filtering sensor. In the calibration experiment, two sensors are set between oil cylinder and hydraulic support as shown in the Fig. 12. So the pressure acting on two sensors is equal.
Fig. 12The calibration experiment of acoustic filtering sensor
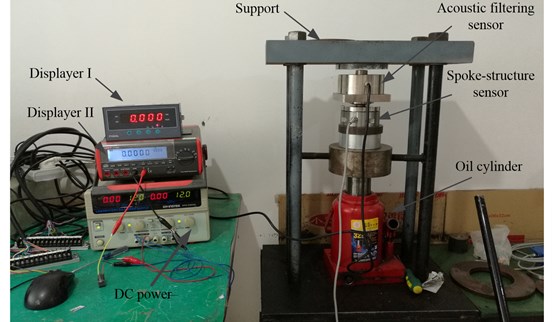
When the experiment is carried out, the pressure applies to the acoustic filtering sensor by oil cylinder, and spoke-structure sensor is also under equal pressure. In the process of loading, the pressure is fast loaded to a series of values which are set by standard spoke-structure sensor. As shown in Table 3, standard value is measured by standard spoke-structure sensor and measured value is measured three times by acoustic filtering sensor.
From Table 3, the max value of absolute error is 0.023 t and the absolute error is 0.017 t when the load is 10 t. Generally, the cage load is 10 t when hoister is in operation, so the designed sensor meet the measurement requirement
Table 3Standard value and measured value in the calibration experiment
Number | Standard value (t) | Measured value (t) | ||||
First | Second | Third | Average | absolute error | ||
1 | 0 | 0 | 0 | 0 | 0 | 0 |
2 | 2 | 2.03 | 2.01 | 2.02 | 2.02 | 0.02 |
3 | 4 | 4.03 | 4.01 | 4.02 | 4.02 | 0.02 |
4 | 6 | 6.03 | 6.03 | 6.01 | 6.023 | 0.023 |
5 | 8 | 8.03 | 8.02 | 8.01 | 8.02 | 0.02 |
6 | 10 | 10.1 | 10.3 | 10.1 | 10.017 | 0.017 |
4.2. Experiment setup and field testing
According to the overall structure of monitoring principle, a device had been design. It’s mainly consist of battery box, acoustic filtering sensor, hall sensor acquisition, transmit unit, receiver box, JHH-XT, the digital collection box and upper computer.
Acoustic fitter measures the signal of wire rope tension, then the signal is acquired and transmitted to receiver box by the acquisition and transmit unit which is provided power by battery box. Finally, the signal of tension and the state of proximity switch will be transmitted to the digital collection box by JHH-XT via R485 communication protocol.
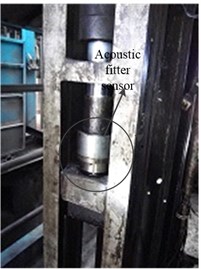
This experiment studies the lifting load of multi-rope friction hoister which is made up of 4 wire ropes and 2 tail ropes in Gao Zhuang coal mine. To compare the performance of acoustic fitter sensor and common sensor, the common sensor is set in the field. Figs. 13-14 shows the installment of common sensor and acoustic fitter sensor in working field. Acoustic fitter sensor and common sensor are installed between sliding block and piston.
Fig. 13The installment of common sensor
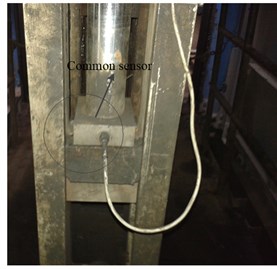
Fig. 14The installment of acoustic fitter sensor
4.3. Data analysis
Fig. 15 shows the change of wire rope tension in the lifting process when using common sensor. The data of common sensor will severely vibrate when hoister lifts cage. The reason of data vibration comes for the vibration of wire rope, friction and shock in lifting process. The accurate value of wire rope tension and the cage load can’t be achieved and the fault can’t be detected when wire rope is out of balance. However, when we adopt the acoustic fitter sensor, the tension data is shown as Fig. 16. There is only small vibration among these tension data. By comparing the theory value and actual value of tension, it can be found this sensor can measure the wire rope tension accurately. Therefore, the effect of noise in lifting process can be eliminated by adopting the designed sensor and the value of tension can be used to monitor the fault of wire rope in real time.
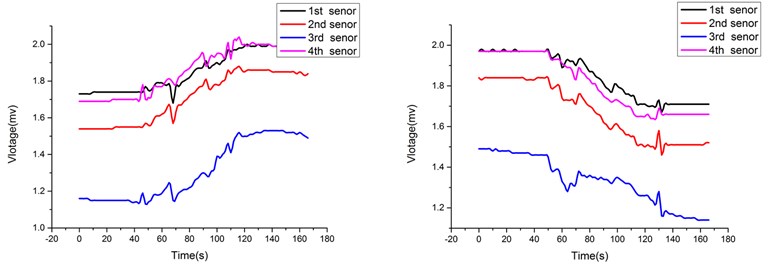
As shown in this Fig. 16, the tension data is linear because the end rope weight’s variation is in linear with height of cage, which shows the accuracy of sensor. The Fig. 17 shows each tension data of wire rope. Each wire rope tension’s variation keeps the same when the balance oil cylinder works normally. These tensions data keep good linearity.
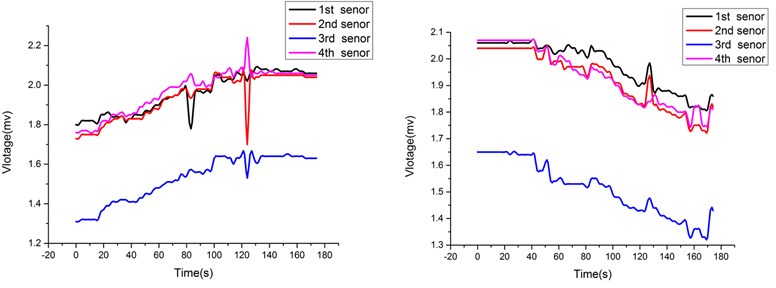
In Fig. 18, we can find out when second and third oil cylinder is out of its adjustment range, their tension data is far different from other wire ropes’ tension data which means the wire rope tension will be unbalanced. In Fig. 19, only the third oil cylinder is out of its adjustment range which leads to the tension unbalance of the third wire rope. Therefore, by adopting the acoustic filtering sensor, the effect of noise in tension measurement can be eliminated and accurate tension value of each wire rope can be got, and the fault of unbalanced tensions can also be timely found out. So the acoustic filtering sensor is very significant for wire rope tension monitoring device.
Fig. 15The data of common sensor
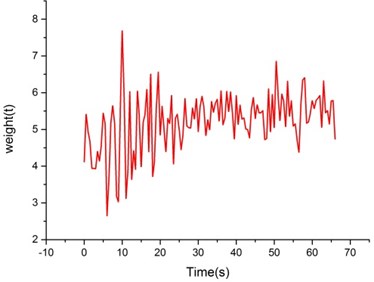
Fig. 16The data of acoustic filtering sensor
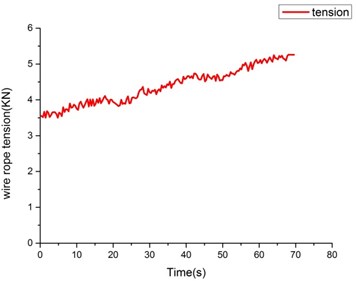
Fig. 17The tension changing curve of four wire ropes in a lifting cycle
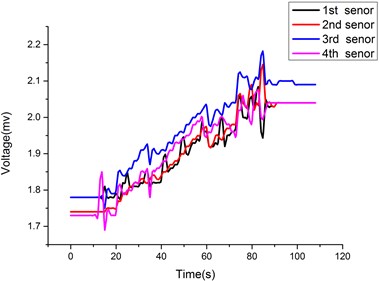
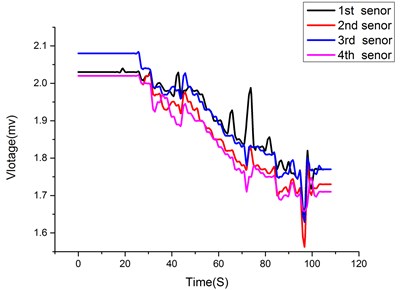
Fig. 18The tension data when two wire-rope are unbalanced
4.4. The uncertainty of the wire rope tension monitoring device
About the uncertainty of wire rope tension monitoring device, there are two resources from in practical application, one is the contact condition between trail and cage. If the trail is rough or cage is stuck, the tension of wire rope will increase, and the cage load calculated will increase by adding each wire rope tension.
Fig. 19The tension data when one wire-rope is unbalanced
The other uncertainty comes from the working condition of the system. Because the sensors are installed between balance oil cylinders and sliding blocks. According to the mechanics principle, the sensor measures the value of pressure from oil cylinder in fact. If the friction between track and sliding block is considered, the tension of each wire rope can be expressed as following Eq. (12):
where T is the tension of wire rope, P is the pull force which acts on the sliding block, f is the friction between track and sliding block.
In the operation process of the hoister, the piston of oil cylinder will move when wire rope tensions are out of balance and the piston will stop when wire rope tensions are balance. When the piston moves, the friction is dynamic friction. When the piston stops, the friction is static friction. When the friction is static friction, the value of friction is random depend on the mechanical state of cage and can be not calculated. The randomness of static friction results in the uncertainty of wire rope tension. So tension data exist small vibration in the lifting process as shown above figure, which is got by the measurement system.
5. Conclusions
1) This paper proposes a measurement method to monitor wire rope tension of multi-rope friction hoister. The method installs pressure sensor between piston and sliding block in the self-balance device. By this way, wire rope tension measurement is transferred to pressure measurement between piston and sliding, which avoid the pull sensor in series with wire rope and improve the safety measurement factor.
2) This paper develops a novel tension monitoring device of multi-rope friction hoister by using acoustic filtering sensor. This system can accurately measure each tension of wire rope and lifting load real time, and judge whether unbalance tension of wire rope or not, which is of great significance to the safety of coal mine production.
3) This paper designs a new acoustic filtering sensor. This sensor transfer pressure signal to oil pressure signal in oil cavity set in this sensor. By measuring oil pressure signal, the wire rope tension can be got. Because of the filtering characteristic of oil cavity and gap, the vibration and shock energy is absorbed and effective signal can be extracted so that we can get the value of wire rope tension to realize real-time tension monitoring.
References
-
Alani M., Raoof M. Effect of mean axial load on axial fatigue life of spiral strands. International Journal of Fatigue, Vol. 19, Issue 1, 1997, p. 1-11.
-
Nasution F. P., Sævik S., Gjøsteen J. K. Ø. Finite element analysis of the fatigue strength of copper power conductors exposed to tension and bending loads. International Journal of Fatigue, Vol. 59, 2014, p. 114-128.
-
Suh I., Chang S. P. Experimental study on fatigue behavior of wire ropes. International Journal of Fatigue, Vol. 22, Issue 4, 2000, p. 339-347.
-
Giglio M., Manes A. Life prediction of a wire rope subjected to axial and bending loads. Engineering Failure Analysis, Vol. 12, Issue 4, 2005, p. 549-568.
-
Xiang L., Wang H. Y., Chen Y., et al. Modeling of multi-strand wire ropes subjected to axial tension and torsion loads. International Journal of Solids and Structures, Vol. 58, 2015, p. 233-246.
-
Wang D., Zhang D., Mao X., et al. Dynamic friction transmission and creep characteristics between hoisting rope and friction lining. Engineering Failure Analysis, Vol. 57, 2015, p. 499-510.
-
Wang Guangfei Marking method to determinate value of rope slot cutting in multi-rope friction hoist drum. Coal Science and Technology, Vol. 8, 1992, p. 25-30.
-
Kwun H., Burkhardt G. L. Relationship between reflected signal amplitude and defect size in rope inspection using a transverse-impulse vibrational wave. NDT&E International, Vol. 24, 1991, p. 317-319.
-
An Wei, Wei Renzhi, Zhang Qiming Research and development on sensor for wire rope dynamic tension of multiple-rope winder. Instrument Technique and Sensor, Vol. 11, Issues 6-7, 2003.
-
Yao Wenbin, Shao Qianjun, Zhang Wei Study on mine hoist wire rope tension meter. Journal of China Coal Society, Vol. 3, 2004, p. 317-375.
-
Jin Huawei, Zhang Xin, Lv Jiajia Design of strain sensor for measuring tension of steel ropes. Mining and Processing Equipment, Vol. 13, 2010, p. 51-53.
-
Zhang X. The research of stress monitor and broken testing for steel wire rope. 9th International Conference on Electronic Measurement and Instruments, 2009, p. 1044-1047.
-
Zhang R., Duan Y., Or S. W., et al. Smart elasto-magneto-electric (EME) sensors for stress monitoring of steel cables: design theory and experimental validation. Sensors, Vol. 14, Issue 8, 2014, p. 13644-13660.
-
Duan Y., Zhang R., Zhao Y., et al. Smart elasto-magneto-electric (EME) sensors for stress monitoring of steel structures in railway infrastructures. Journal of Zhejiang University SCIENCE A, Vol. 12, Issue 12, 2011, p. 895-901.
-
Zheng Gonghuan, Zhu Zhemin, Gong Xiufan Fundamentals of acoustica. NanJing University Press, NanJing, Vol. 5, 2012, p. 113-113.
-
Zhou Chengguang, Liu Bilong, Li Xiaodong, Tian Jing Effect of elastic cavity walls on acoustic characteristics of a water-filled Helmholtz resonator: equivalent lumped parameter model for cylindrical cavity. Acta Acoustica, Vol. 9, 2007, p. 433-434.
Cited by
About this article
The authors are grateful to the anonymous referees for their valuable comments and suggestions for improving the presentation of this paper. Project Funded by the Priority Academic Program Development of Jiangsu Higher Education Institutions (PAPD). Production, Prospective Joint Research Projects in Jiangsu Province (BY2016026-02).
Guiyun Xu provides theoretical guidance. Jianpu Da is responsible for editing and writing paper. Xiaoguang Zhang provides guidance in experiment. Mengfang Han is responsible for paper modification. Tingting Xia is responsible for proofreading and correcting papers.
The authors declare that there is no conflict of interests regarding the publication of this paper.

